Home » Sitecore User Group
Category Archives: Sitecore User Group
Expand Tokens on Items Using a Sitecore PowerShell Extensions Toolbox Script
Last Wednesday I had the opportunity of presenting Sitecore PowerShell Extensions (SPE) at the Milwaukee Sitecore Meetup. During this presentation, I demonstrated how quickly and easily one can add, execute and reuse PowerShell scripts in SPE, and I did this using version 3.0 of SPE on Sitecore XP 8.
During one segment of the presentation, I shared how one can seamlessly add scripts to the SPE Toolbox — a repository of utility scripts if you will — and used the following script when showing this:
<#
    .NAME
        Expand tokens in all content items

    .SYNOPSIS
        Expand tokens in all fields in all content items
    .NOTES
        Mike Reynolds
#>

$items = Get-ChildItem -Path "master:\sitecore\content" -Recurse
$items | ForEach-Object { $_.Fields.ReadAll() }
$items |  Expand-Token
Close-Window
The script above grabs all descendant Items under /sitecore/content/; iterates over them to ensure all field values are available — the ReadAll() method on the FieldCollection instance will ensure values from fields on the Item’s template’s Standard Values Item are pulled in for processing; and sends in these Items into the Expand-Token commandlet which comes “out of the box” with SPE.
The script also closes the processing dialog.
I then saved the above script into my Toolbox library in my SPE module:

Let’s try this out. Let’s find some Items with tokens in some fields. It looks like the Home Item has some:

Here’s another Item that also has tokens:

Let’s go to the SPE Toolbox, and click on our Toolbox utility:

As you can see the tokens were expanded on the Home Item:

Tokens were also expanded on the descendant Item:

If you have any thoughts and/or suggestions on this, or have ideas for other SPE Toolbox scripts, please drop a comment.
If you would like to watch the Milwaukee Sitecore Meetup presentation where I showed the above — you’ll also get to see some epic Sitecore PowerShell Extensions stuff from Adam Brauer, Senior Product Engineer at Active Commerce, in this presentation as well — have a look below:
If you would like to see another example of adding a script to the SPE Toolbox, please see my previous post on this subject.
Until next time, have a scriptaculous day!
Add to the Sitecore Gutter Using Sitecore PowerShell Extensions
Last Wednesday I had the pleasure of presenting Sitecore PowerShell Extensions (SPE) at the Milwaukee Sitecore Meetup. The goal of my presentation was to share how easy it is to add, execute and reuse PowerShell scripts in SPE, and I did this on version 3.0 of SPE in a Sitecore XP 8 instance.
In my presentation, I showed how quickly one can add a custom Sitecore gutter icon with SPE, and used the following script to demonstrate that:
<#
    .NAME
        Item Has 20 Or More Sub-items Gutter

    .SYNOPSIS
        Renders gutters indicated whether the item has more than 20 sub-items.

    .NOTES
        Mike Reynolds
#>

$item = Get-Item .
$gutter = New-Object Sitecore.Shell.Applications.ContentEditor.Gutters.GutterIconDescriptor
if($item.Children.Count -gt 20) {
    $gutter.Icon = "Applications/16x16/delete.png"
    $gutter.Tooltip = "This Item has more than 20 sub-items!"

} else {
    $gutter.Icon = "Applications/16x16/check2.png"
    $gutter.Tooltip = "This Item has 20 or less sub-items."
}

$gutter
The script above creates a new Sitecore.Shell.Applications.ContentEditor.Gutters.GutterIconDescriptor instance — this class is defined in Sitecore.Kernel.dll — and sets a certain icon and tooltip on it if the context Item has more than 20 sub-items. If the Item has 20 or less sub-items, a different icon and tooltip are used.
The script then outputs the GutterIconDescriptor instance.
I then saved the above script to the Gutter integration point in my SPE module:

Now that it’s saved, we have to sync it to the Sitecore Gutter:

We should be good to go! Let’s test this out!
I went to my content tree; right-clicked in the gutter area; and was presented with the gutter menu:

After clicking my new gutter menu option, I was presented with gutter icons next to Items in my tree:
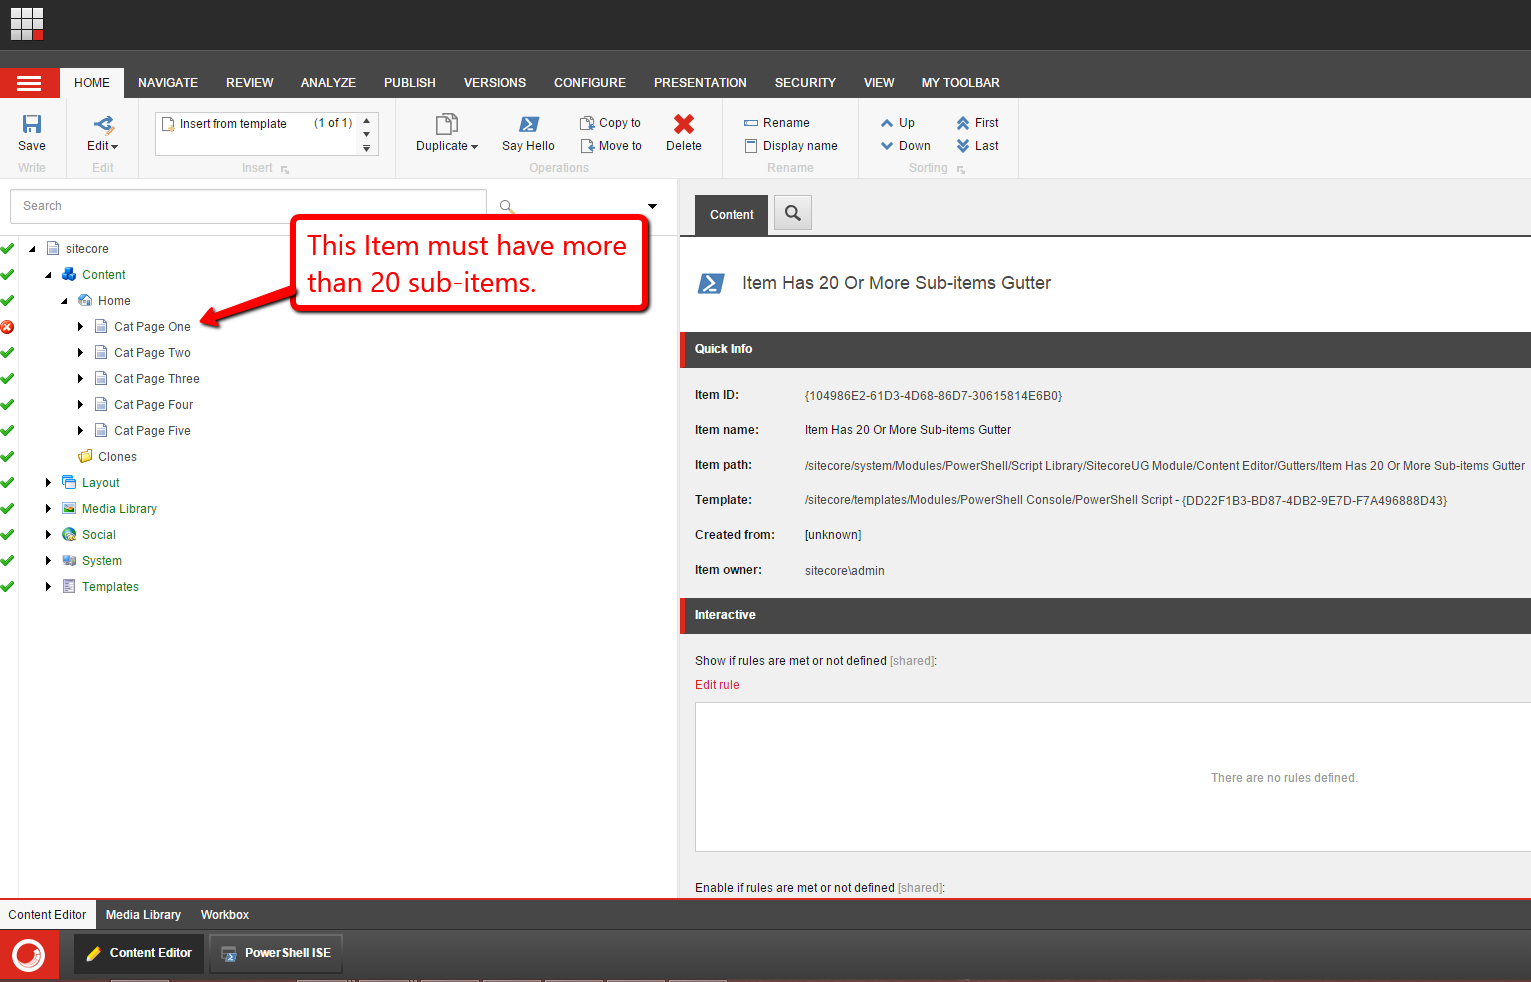
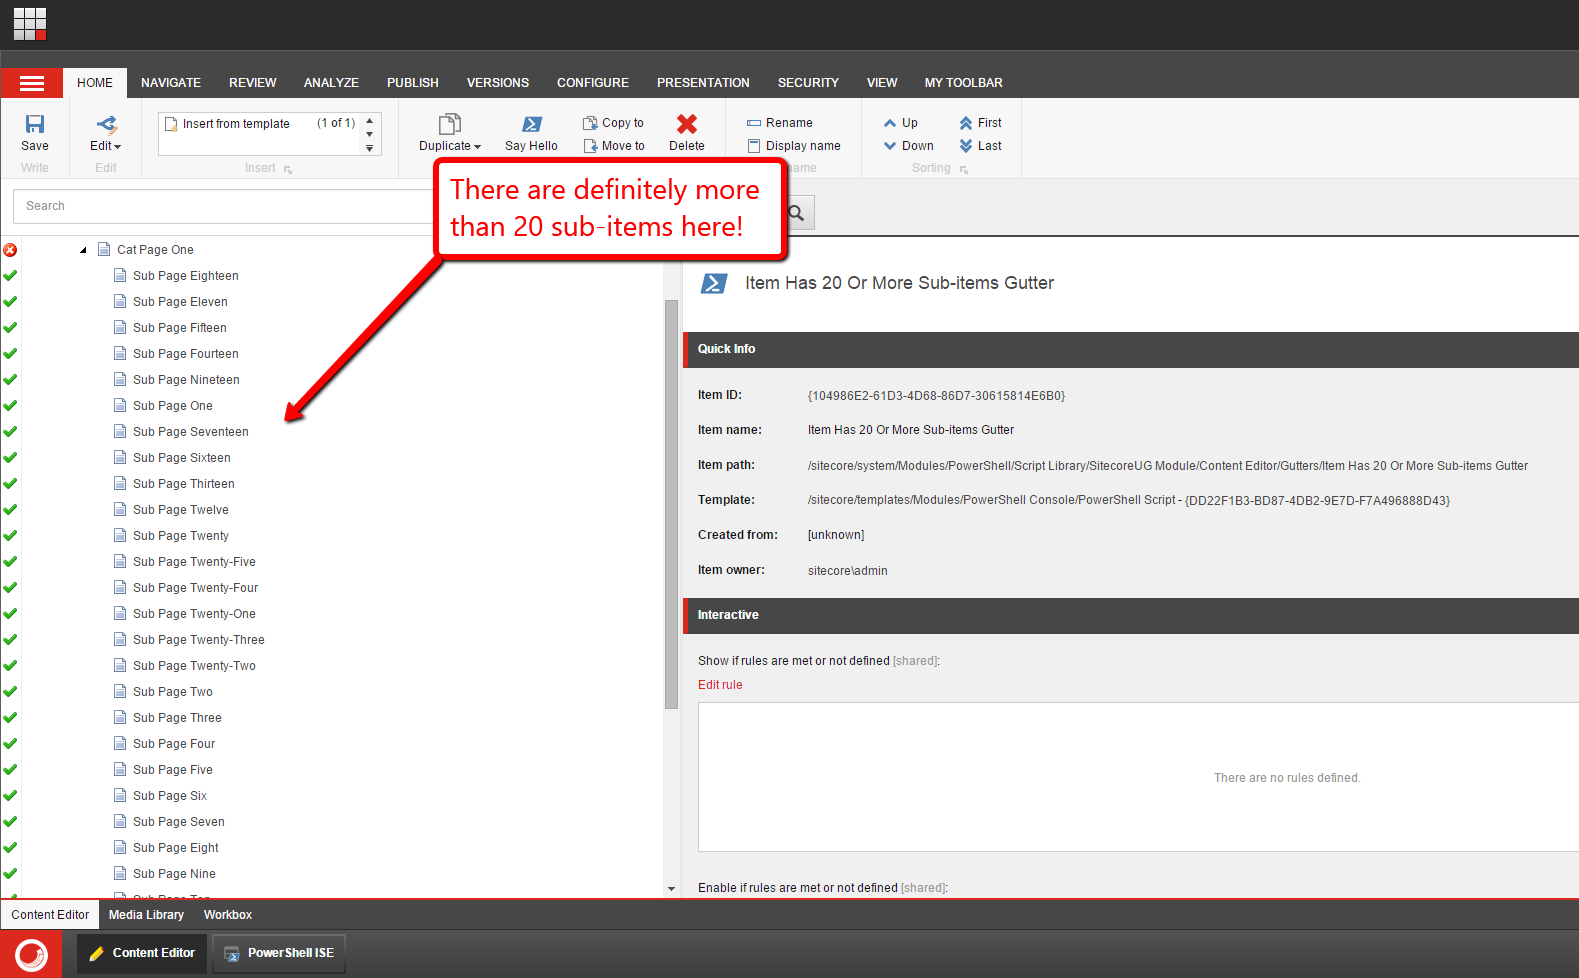
As you can see, the Item with the X icon has more than 20 sub-items:
For comparison, the following Item has a green check-mark icon next to it which indicates it has 20 or less sub-items (this Item actually has 10 sub-items):

If you have any thoughts and/or suggestions on this, or have ideas for other gutter icon scripts that can be incorporated into SPE, please share in a comment.
If you would like to watch the Milwaukee Sitecore Meetup presentation where I showed the above — you’ll also get to see some cool Sitecore PowerShell Extensions stuff from Adam Brauer, Senior Product Engineer at Active Commerce, in this presentation as well — have a look below:
Until next time, keep on learning and sharing!
Bucket Items in Sitecore using a Custom Commandlet in Sitecore PowerShell Extensions
Last Wednesday I had the privilege to present Sitecore PowerShell Extensions (SPE) at the Milwaukee Sitecore Meetup. During my presentation, I demonstrated how easy it is to add, execute and reuse PowerShell scripts in SPE, and I showcased version 3.0 of SPE on Sitecore XP 8.
Unfortunately, I ran out of time before showing how one can go about creating a custom commandlet in SPE, and hope to make it up to everyone by sharing the commandlet I wrote for the presentation in this post.
I wrote the following commandlet to convert an Item into an Item Bucket in Sitecore:
using System;
using System.Management.Automation;

using Sitecore.Data.Items;
using Sitecore.Shell.Framework.Commands;

using Cognifide.PowerShell.Commandlets;
using Cognifide.PowerShell.Commandlets.Interactive.Messages;

namespace Sitecore.Sandbox.SPE.Commandlets.Buckets
{
    [Cmdlet(VerbsData.ConvertTo, "Bucket"), OutputType(new Type[] { typeof(Item) })]
    public class ConvertToBucketCommand : BaseItemCommand
    {
        protected override void ProcessItem(Item item)
        {
            try
            {
                PutMessage(new ShellCommandInItemContextMessage(item, "item:bucket"));
            }
            catch (Exception exception)
            {
                WriteError(new ErrorRecord(exception, "sitecore_new_bucket_error", ErrorCategory.NotSpecified, Item));
            }

            WriteItem(Item);
        }
    }
}
The above commandlet implements the ProcessItem() method — this method is declared abstract in one of the ancestor classes of the class above — and leverages the framework of SPE to invoke a Sheer UI command to bucket the Item passed to the method — one of the ancestor classes of this class passes the Item to be processed.
The above highlights how in SPE we are employing the Template method pattern for many “out of the box” commandlets. This involves inheriting from an abstract base class — Cognifide.PowerShell.Commandlets.BaseItemCommand in Cognifide.PowerShell.dll (this assembly comes with the SPE module) is an example of one of these base classes — and implementing methods that are defined as abstract. The parent or an ancestor class will do the brunt of the work behind the scenes, and use your method implementation for specifics.
As a side note, we also provide method hooks as well — these are virtual methods defined on a base or ancestor class — which you can override to change how they work to meet your particular needs.
I then wired the above up using a Sitecore include configuration file:
<?xml version="1.0" encoding="utf-8" ?>
<configuration xmlns:patch="http://www.sitecore.net/xmlconfig/">
  <sitecore>
    <powershell>
      <commandlets>
        <add Name="Custom Bucket Commandlets" type="*, Sitecore.Sandbox.SPE" />
      </commandlets>
    </powershell>
  </sitecore>
</configuration>
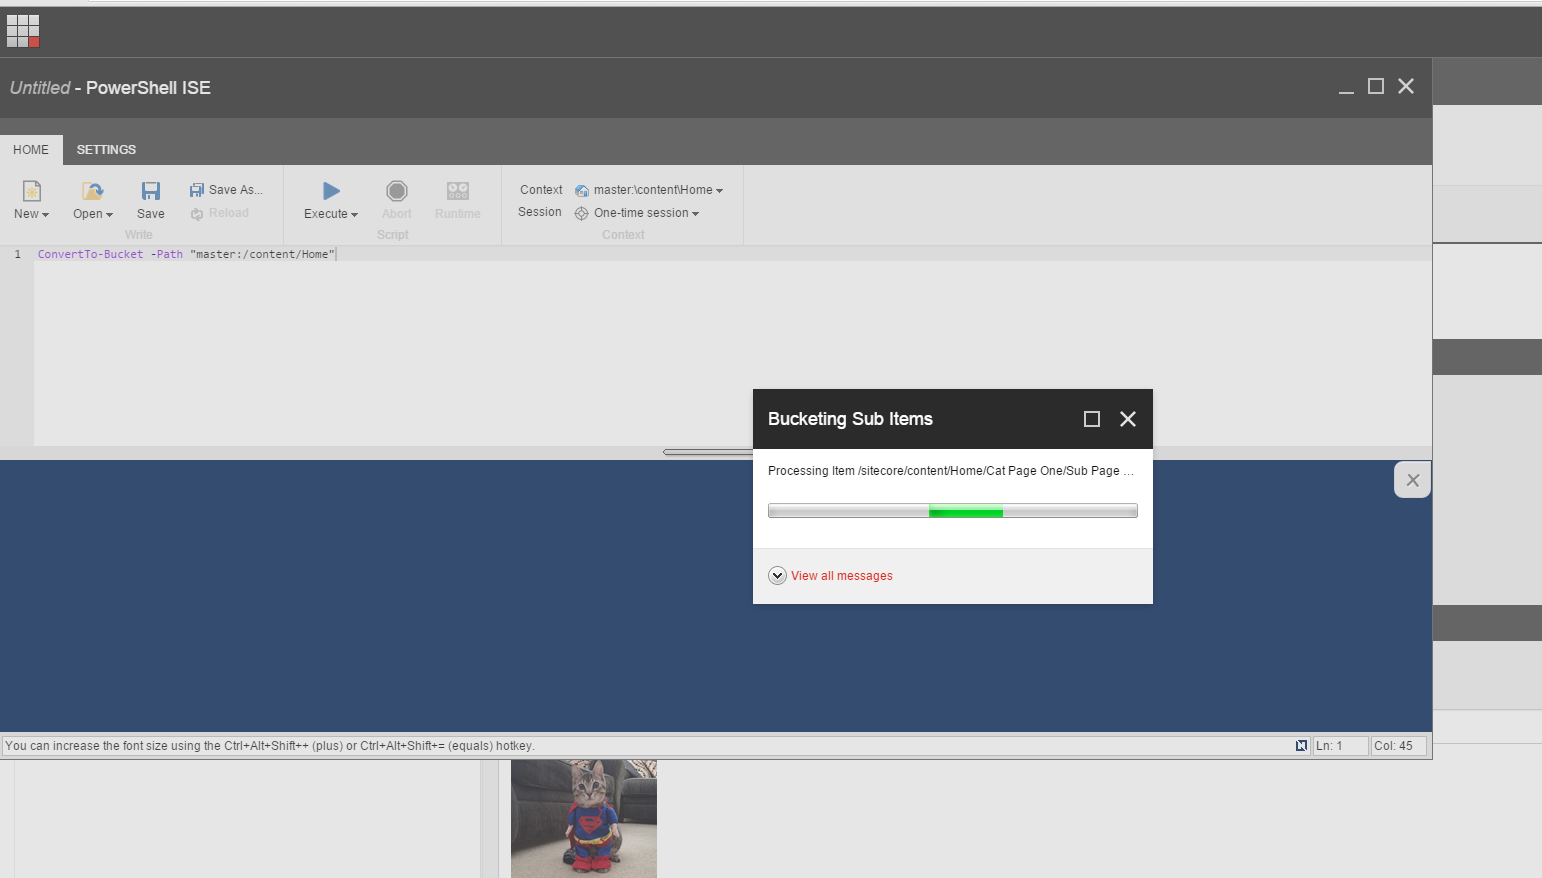
I deployed the above to my Sitecore instance; loaded up the Integrated Scripting Environment (ISE) in SPE; and saw that my commandlet was registered using the Control-Space shortcut key:

Let’s take this for a spin. Let’s convert the Home Item into an Item Bucket:

Here’s my script to do that:

I clicked the execute button, and then got this confirmation dialog:

I then clicked the “Ok” button and was immediately presented with this dialog:
As you can see it worked! The Home Item in my content tree is now an Item Bucket:

If you have any thoughts on this or ideas for other custom commandlets for SPE, please share in a comment.
If you would like to watch the Milwaukee Sitecore Meetup presentation where I showcased Sitecore PowerShell Extensions — and as a bonus you’ll also get to see some real-life application of SPE from Adam Brauer, Senior Product Engineer at Active Commerce, in this presentation as well — it has been recorded for posterity, and you can watch it here:
Until next time, stay curious, keep experimenting, and let’s keep on sharing all the Sitecore things!
Bucket and Unbucket Items via Custom Item Context Menu Options Using Sitecore PowerShell Extensions
Last Wednesday I was honored to present Sitecore PowerShell Extensions (SPE) at the Milwaukee Sitecore Meetup. My presentation was all about how easy it is to add, execute and reuse PowerShell scripts in SPE, and I showcased this using version 3.0 of SPE on Sitecore XP 8.
During the presentation, I demonstrated how one can go about adding custom Item Context Menu options using SPE, and did so with the following scripts which bucket and unbucket Sitecore Items:
 <#
    .NAME
        Convert To Item Bucket

    .SYNOPSIS
        Converts the context item to an Item Bucket

    .NOTES
        Mike Reynolds
#>

$item = Get-Item .

if($item."__Is Bucket" -eq "1") {
   return
}

Get-ChildItem . -Recurse | %{ $_.__Bucketable = "1" }
Invoke-ShellCommand -Name "item:bucket" -Item $item
Close-Window
The above PowerShell script basically checks to see if an Item is an Item Bucket and does nothing if it is. If the Item is not an Item Bucket, we make sure all sub-items are bucketable — we just tick the “__Bucketable” Checkbox field on them — and invoke the Sheer UI command for converting an Item into an Item Bucket — this is done via the Invoke-ShellCommand commandlet that ships with SPE — and then close the script execution dialog users are presented with when SPE executes a script in the Item Context Menu.
The following script does the exact opposite of the script above — it converts an Item Bucket back to a regular Sitecore Item using the Sheer UI command for unbucketing:
<#
    .NAME
        Convert Item Bucket To A Regular Item

    .SYNOPSIS
        Converts an Item Bucket to a regular Item

    .NOTES
        Mike Reynolds
#>

$item = Get-Item .

if($item."__Is Bucket" -ne "1") {
   return
}

Invoke-ShellCommand -Name "item:unbucket" -Item $item
Close-Window
I then saved the above scripts to a Context Menu integration point in a SPE module I created during the presentation using the SPE Integrated Scripting Environment (ISE) (to get to the ISE in SPE, go to Sitecore ==> Development Tools ==> PowerShell ISE in the Sitecore Start menu of the Sitecore Desktop):

I’ve omitted screenshots on saving the “Convert Item Bucket To A Regular Item” script for brevity.
I then set rules in the “Show if rules are met or not defined” field on both Context Menu script Items — we only want the “Convert To Item Bucket” Context Menu option to show when the Item isn’t an Item Bucket, and the “Convert Item Bucket To A Regular Item” Context Menu option to show when the Item it is an Item Bucket:
The “Convert To Item Bucket” Context Menu item (this Item was saved to /sitecore/system/Modules/PowerShell/Script Library/SitecoreUG Module/Content Editor/Context Menu/Convert To Item Bucket in my Sitecore instance):

The “Convert Item Bucket To A Regular Item” Context Menu item:

After saving the above, I navigated to an Item in my content tree that has sub-items, right-clicked on it, and clicked on the “Convert To Item Bucket” Context Menu option:

I was then presented with a confirmation dialog:

As you can see the Item is now an Item Bucket:

I right-clicked on the Item again, and clicked on the “Convert Item Bucket To A Regular Item” Context Menu option:

I was presented with another confirmation dialog:

As you can see the Item is no longer an Item Bucket:

If you have any thoughts on this or ideas for other Context Menu PowerShell scripts for SPE, please drop a comment.
If you would like to watch the Milwaukee Sitecore Meetup presentation where I showed the above — you’ll also get to see some cool Sitecore PowerShell Extensions stuff from Adam Brauer, Senior Product Engineer at Active Commerce, in this presentation as well — have a look below:
Until next time, have a Sitecoretastic day!
Clone Items using the Sitecore Item Web API
Yesterday, I had the privilege to present with Ben Lipson and Jamie Michalski, both of Velir, on the Sitecore Item Web API at the New England Sitecore User Group — if you want to see us in action, check out the recording of our presentation!
Plus, my slides are available here!
During my presentation, I demonstrated how easy it is to customize the Sitecore Item API by adding a custom <itemWebApiRequest> pipeline processor, and a custom pipeline to handle a cloning request — for another example on adding a custom <itemWebApiRequest> pipeline processor, and another pipeline to execute a different custom operation, have a look at this post where I show how to publish Items using the Sitecore Item Web API.
For any custom pipeline you build for the Sitecore Item Web API, you must define a Parameter Object that inherits from Sitecore.ItemWebApi.Pipelines.OperationArgs:
using System.Collections.Generic;

using Sitecore.Data.Items;

using Sitecore.ItemWebApi.Pipelines;

namespace Sitecore.Sandbox.ItemWebApi.Pipelines.Clone
{
    public class CloneArgs : OperationArgs
    {
        public CloneArgs(Item[] scope)
            : base(scope)
        {
        }

        public IEnumerable<Item> Destinations { get; set; }

        public bool IsRecursive { get; set; }

        public IEnumerable<Item> Clones { get; set; }
    }
}
I added three properties to the class above: a property to hold parent destinations for clones; another indicating whether all descendants should be cloned; and a property to hold a collection of the clones.
I then created a base class for processors of my custom pipeline for cloning:
using Sitecore.ItemWebApi.Pipelines;

namespace Sitecore.Sandbox.ItemWebApi.Pipelines.Clone
{
    public abstract class CloneProcessor : OperationProcessor<CloneArgs>
    {
        protected CloneProcessor()
        {
        }
    }
}
The above class inherits from Sitecore.ItemWebApi.Pipelines.OperationProcessor which is the base class for most Sitecore Item Web API pipelines.
The following class serves as one processor of my custom cloning pipeline:
using System.Collections.Generic;

using Sitecore.Data.Items;
using Sitecore.Diagnostics;

namespace Sitecore.Sandbox.ItemWebApi.Pipelines.Clone
{
    public class CloneItems : CloneProcessor
    {
        public override void Process(CloneArgs args)
        {
            Assert.ArgumentNotNull(args, "args");
            Assert.ArgumentNotNull(args.Scope, "args.Scope");
            Assert.ArgumentNotNull(args.Destinations, "args.Destinations");
            IList<Item> clones = new List<Item>();
            foreach (Item itemToClone in args.Scope)
            {
                foreach (Item destination in args.Destinations)
                {
                    clones.Add(CloneItem(itemToClone, destination, args.IsRecursive));
                }
            }

            args.Clones = clones;
        }

        private Item CloneItem(Item item, Item destination, bool isRecursive)
        {
            Assert.ArgumentNotNull(item, "item");
            Assert.ArgumentNotNull(destination, "destination");
            return item.CloneTo(destination, isRecursive);
        }
    }
}
The class above iterates over all Items in scope — these are the Items being cloned — and clones all to the specified destinations (parent Items of the clones).
I then spun up the following class to serve as another processor in my custom cloning pipeline:
using System.Linq;

using Sitecore.Diagnostics;
using Sitecore.Pipelines;

using Sitecore.ItemWebApi.Pipelines.Read;

namespace Sitecore.Sandbox.ItemWebApi.Pipelines.Clone
{
    public class SetResult : CloneProcessor
    {
        public override void Process(CloneArgs args)
        {
            Assert.ArgumentNotNull(args, "args");
            Assert.ArgumentNotNull(args.Clones, "args.Clones");
            if (args.Result == null)
            {
                ReadArgs readArgs = new ReadArgs(args.Clones.ToArray());
                CorePipeline.Run("itemWebApiRead", readArgs);
                args.Result = readArgs.Result;
            }
        }
    }
}
The above class delegates to the <itemWebApiRead> pipeline which retrieves the clones from Sitecore, and stores these in the Parameter Object instance for the custom cloning pipeline.
In order to handle custom requests in the Sitecore Item Web API, you must create a custom <itemWebApiRequest> pipeline processor. I put together the following class to handle my cloning operation:
using System;
using System.Collections.Generic;
using System.Linq;

using Sitecore.Data.Items;
using Sitecore.Diagnostics;
using Sitecore.ItemWebApi;
using Sitecore.ItemWebApi.Pipelines.Request;
using Sitecore.Pipelines;
using Sitecore.Text;
using Sitecore.Web;

using Sitecore.Sandbox.ItemWebApi.Pipelines.Clone;

namespace Sitecore.Sandbox.ItemWebApi.Pipelines.Request
{
    public class ResolveCloneAction : RequestProcessor
    {
        public override void Process(RequestArgs args)
        {
            Assert.ArgumentNotNull(args, "args");
            Assert.ArgumentNotNullOrEmpty(RequestMethod, "RequestMethod");
            Assert.ArgumentNotNullOrEmpty(MultipleItemsDelimiter, "MultipleItemsDelimiter");
            if (!ShouldProcessRequest(args))
            {
                return;
            }

            IEnumerable<Item> destinations = GetDestinationItems();
            if (!destinations.Any())
            {
                Logger.Warn("Cannot process clone action: there are no destination items!");
                return;
            }

            CloneArgs cloneArgs = new CloneArgs(args.Scope)
            {
                Destinations = destinations,
                IsRecursive = DoRecursiveCloning()
            };
            CorePipeline.Run("itemWebApiClone", cloneArgs);
            args.Result = cloneArgs.Result;
        }

        private bool ShouldProcessRequest(RequestArgs args)
        {
            // Is this the request method we care about?
            if (!AreEqualIgnoreCase(args.Context.HttpContext.Request.HttpMethod, RequestMethod))
            {
                return false;
            }

            // are multiple axes supplied?
            if (WebUtil.GetQueryString("scope").Contains(MultipleItemsDelimiter))
            {
                Logger.Warn("Cannot process clone action: multiple axes detected!");
                return false;
            }

            // are there any items in scope?
            if (!args.Scope.Any())
            {
                Logger.Warn("Cannot process clone action: there are no items in Scope!");
                return false;
            }

            return true;
        }

        private static bool AreEqualIgnoreCase(string one, string two)
        {
            return string.Equals(one, two, StringComparison.CurrentCultureIgnoreCase);
        }

        private IEnumerable<Item> GetDestinationItems()
        {
            char delimiter;
            Assert.ArgumentCondition(char.TryParse(MultipleItemsDelimiter, out delimiter), "MultipleItemsDelimiter", "MultipleItemsDelimiter must be a single character!");
            ListString destinations = new ListString(WebUtil.GetQueryString("destinations"), delimiter);
            return (from destination in destinations
                    let destinationItem = GetItem(destination)
                    where destinationItem != null
                    select destinationItem).ToList();
        }

        private Item GetItem(string path)
        {
            try
            {
                return Sitecore.ItemWebApi.Context.Current.Database.Items[path];
            }
            catch (Exception ex)
            {
                Logger.Error(ex);
            }

            return null;
        }

        private bool DoRecursiveCloning()
        {
            bool recursive;
            if (bool.TryParse(WebUtil.GetQueryString("recursive"), out recursive))
            {
                return recursive;
            }

            return false;
        }

        private string RequestMethod { get; set; }

        private string MultipleItemsDelimiter { get; set; }
    }
}
The above class ascertains whether it should handle the request: is the RequestMethod passed via configuration equal to the request method detected, and are there any Items in scope? I also built this processor to handle only one axe in order to keep the code simple.
Once the class determines it should handle the request, it grabs all destination Items from the context database — this is Sitecore.ItemWebApi.Context.Current.Database which is populated via the sc_database query string parameter passed via the request.
Further, the class above detects whether the cloning operation is recursive: should we clone all descendants of the Items in scope? This is also passed by a query string parameter.
I then glued everything together using the following Sitecore configuration file:
<?xml version="1.0" encoding="utf-8"?>
<configuration xmlns:patch="http://www.sitecore.net/xmlconfig/">
  <sitecore>
    <pipelines>
      <itemWebApiClone>
        <processor type="Sitecore.Sandbox.ItemWebApi.Pipelines.Clone.CloneItems, Sitecore.Sandbox" />
        <processor type="Sitecore.Sandbox.ItemWebApi.Pipelines.Clone.SetResult, Sitecore.Sandbox" />
      </itemWebApiClone>
      <itemWebApiRequest>
        <processor patch:before="*[@type='Sitecore.ItemWebApi.Pipelines.Request.ResolveAction, Sitecore.ItemWebApi']"
                   type="Sitecore.Sandbox.ItemWebApi.Pipelines.Request.ResolveCloneAction, Sitecore.Sandbox">
          <RequestMethod>clone</RequestMethod>
          <MultipleItemsDelimiter>|</MultipleItemsDelimiter>
        </processor>
      </itemWebApiRequest>
    </pipelines>
  </sitecore>
</configuration>
Let’s clone the following Sitecore Item with descendants to two folders:

In order to make this happen, I spun up the following HTML page using jQuery — no doubt the front-end gurus reading this are cringing when seeing the following code, but I am not much of a front-end developer:
<!DOCTYPE html>
<html lang="en">
	<head>
		<script src="//ajax.googleapis.com/ajax/libs/jquery/2.1.1/jquery.min.js"></script>
		<script src="//cdnjs.cloudflare.com/ajax/libs/json3/3.3.2/json3.min.js"></script>
		<script src="//cdnjs.cloudflare.com/ajax/libs/prettify/r224/prettify.js"></script>
		<link rel="stylesheet" type="text/css" href="//cdnjs.cloudflare.com/ajax/libs/prettify/r224/prettify.css" />
	</head>
	<body>
		<img width="400" style="display: block; margin-left: auto; margin-right: auto" src="/assets/img/clone-all-the-things.jpg" />
		<input type="button" id="button" value="Clone" style="width:100px;height:50px;font-size: 24px;" />
		<h2 id="confirmation" style="display: none;">Whoa! Something happened!</h2>
		<div id="working" style="display: none;"><img style="display: block; margin-left: auto; margin-right: auto" src="/assets/img/arrow-working.gif" /></div>
		<pre id="responseContainer" class="prettyprint" style="display: none;"><code id="response" class="language-javascript"></code></pre>
		<script type="text/javascript">
		$('#button').click(function() {
			$('#confirmation').hide();
			$('#responseContainer').hide();
			$('#working').show();
			$.ajax({
					type:'clone',
					url: "http://sandbox7/-/item/v1/sitecore/content/Home/Landing Page One?scope=s&destinations=/sitecore/content/Home/Clones|/sitecore/content/Home/Some More Clones&recursive=true&sc_database=master",
					headers:{
						"X-Scitemwebapi-Username":"extranet\\ItemWebAPI",
						"X-Scitemwebapi-Password":"1t3mW3bAP1"}
				}).done(function(response) {
					$('#confirmation').show();
					$('#response').html(JSON.stringify(response, null, 4));
					$('#working').hide();
					$('#responseContainer').show();
				});
		});
		</script>
	</body>
</html>
Plus, please pardon the hard-coded Sitecore credentials — I know you would never store a username and password in front-end code, right? 😉
The above HTML page looks like this on initial load:

I then clicked the ‘Clone’ button, and saw the following:

As you can see, the target Item with descendants were cloned to the destination folders set in the jQuery above:

If you have any thoughts on this, or have other ideas around customizing the Sitecore Item Web API, please share in a comment.
