Home » Customization (Page 7)
Category Archives: Customization
Add ‘Has Content In Language’ Property to Sitecore Item Web API Responses
The other day I had read a forum thread on SDN where the poster had asked whether one could determine if content returned from the Sitecore Item Web API for an Item was the actual content for the Item in the requested language.
I was intrigued by this question because I would have assumed that no results would be returned for the Item when it does not have content in the requested language but that is not the case: I had replicated what the poster had seen.
As a workaround, I built the following class to serve as an <itemWebApiGetProperties> pipeline processor which sets a property in the response indicating whether the Item has content in the requested language (check out my previous post on adding additional properties to Sitecore Item Web API responses for more information on this topic):
using System.Collections.Generic;
using System.Linq;

using Sitecore.Data.Items;
using Sitecore.Diagnostics;
using Sitecore.Globalization;
using Sitecore.ItemWebApi.Pipelines.GetProperties;

namespace Sitecore.Sandbox.ItemWebApi.Pipelines.GetProperties
{
    public class SetHasContentInLanguageProperty : GetPropertiesProcessor
    {
        public override void Process(GetPropertiesArgs arguments)
        {
            Assert.ArgumentNotNull(arguments, "arguments");
            Assert.ArgumentNotNull(arguments.Item, "arguments.Item");
            arguments.Properties.Add("HasContentInLanguage", IsLanguageInCollection(arguments.Item.Languages, arguments.Item.Language));
        }

        private static bool IsLanguageInCollection(IEnumerable<Language> languages, Language language)
        {
            Assert.ArgumentNotNull(languages, "languages");
            Assert.ArgumentNotNull(language, "language");
            return languages.Any(lang => lang == language);
        }
    }
}
The code in the above class checks to see if the Item has content in the requested language — the latter is set in the Language property of the Item instance, and the Languages property contains a list of all languages it has content for.
I then added the above pipeline processor via the following configuration file:
<?xml version="1.0" encoding="utf-8"?>
<configuration xmlns:patch="http://www.sitecore.net/xmlconfig/">
  <sitecore>
    <pipelines>
      <itemWebApiGetProperties>
        <processor patch:after="processor[@type='Sitecore.ItemWebApi.Pipelines.GetProperties.GetProperties, Sitecore.ItemWebApi']"
            type="Sitecore.Sandbox.ItemWebApi.Pipelines.GetProperties.SetHasContentInLanguageProperty, Sitecore.Sandbox" />
      </itemWebApiGetProperties>
    </pipelines>
  </sitecore>
</configuration>
Let’s see how this works!
I first created an Item for testing:

This Item only has content in English:

I then toggled my Sitecore Item Web API configuration to allow for anonymous access so that I can make requests in my browser, and made a request for the test Item in English:

The Item does have content in English, and this is denoted by the ‘HasContentInLanguage’ property.
I then made a request for the Item in French:

As expected, the ‘HasContentInLanguage’ is false since the Item does not have content in French.
If you have any questions or thoughts on this, please drop a comment.
Export to CSV in the Form Reports of Sitecore’s Web Forms for Marketers
The other day I was poking around Sitecore.Forms.Core.dll — this is one of the assemblies that comes with Web Forms for Marketers (what, you don’t randomly look at code in the Sitecore assemblies? 😉 ) — and decided to check out how the export functionality of the Form Reports work.
Once I felt I understood how the export code functions, I decided to take a stab at building my own custom export: functionality to export to CSV, and built the following class to serve as a pipeline processor to wedge Form Reports data into CSV format:
using System;
using System.Collections.Generic;
using System.Linq;

using Sitecore.Diagnostics;
using Sitecore.Form.Core.Configuration;
using Sitecore.Form.Core.Pipelines.Export;
using Sitecore.Forms.Data;
using Sitecore.Jobs;

namespace Sitecore.Sandbox.Form.Core.Pipelines.Export.Csv
{
    public class ExportToCsv
    {
        public void Process(ExportArgs args)
        {
            Assert.ArgumentNotNull(args, "args");
            LogInfo();
            args.Result = GenerateCsv(args.Packet.Entries);
        }

        protected virtual void LogInfo()
        {
            Job job = Context.Job;
            if (job != null)
            {
                job.Status.LogInfo(ResourceManager.Localize("EXPORTING_DATA"));
            }
        }

        private string GenerateCsv(IEnumerable<IForm> forms)
        {
            return string.Join(Environment.NewLine, GenerateAllCsvRows(forms));
        }

        protected virtual IEnumerable<string> GenerateAllCsvRows(IEnumerable<IForm> forms)
        {
            Assert.ArgumentNotNull(forms, "forms");
            IList<string> rows = new List<string>();
            rows.Add(GenerateCsvHeader(forms.FirstOrDefault()));
            foreach (IForm form in forms)
            {
                string row = GenerateCsvRow(form);
                if (!string.IsNullOrWhiteSpace(row))
                {
                    rows.Add(row);
                }
            }

            return rows;
        }

        protected virtual string GenerateCsvHeader(IForm form)
        {
            Assert.ArgumentNotNull(form, "form");
            return string.Join(",", form.Field.Select(field => field.FieldName));
        }

        protected virtual string GenerateCsvRow(IForm form)
        {
            Assert.ArgumentNotNull(form, "form");
            return string.Join(",", form.Field.Select(field => field.Value));
        }
    }
}
There really isn’t anything magical happening in the code above. The code creates a string of comma-separated values for each row of entries in args.Packet.Entries, and puts these plus a CSV header into a collection of strings.
Once all rows have been placed into a collection of strings, they are munged together on the newline character ultimately creating a multi-row CSV string. This CSV string is then set on the Result property of the ExportArgs instance.
Now we need a way to invoke a pipeline that contains the above class as a processor, and the following command does just that:
using System.Collections.Specialized;

using Sitecore.Diagnostics;
using Sitecore.Forms.Core.Commands.Export;
using Sitecore.Form.Core.Configuration;
using Sitecore.Shell.Framework.Commands;

namespace Sitecore.Sandbox.Forms.Core.Commands.Export
{
    public class Export : ExportToXml
    {
        protected override void AddParameters(NameValueCollection parameters)
        {
            parameters["filename"] = FileName;
            parameters["contentType"] = MimeType;
        }

        public override void Execute(CommandContext context)
        {
            SetProperties(context);
            base.Execute(context);
        }

        private void SetProperties(CommandContext context)
        {
            Assert.ArgumentNotNull(context, "context");
            Assert.ArgumentNotNull(context.Parameters, "context.Parameters");
            Assert.ArgumentNotNullOrEmpty(context.Parameters["fileName"], "context.Parameters[\"fileName\"]");
            Assert.ArgumentNotNullOrEmpty(context.Parameters["mimeType"], "context.Parameters[\"mimeType\"]");
            Assert.ArgumentNotNullOrEmpty(context.Parameters["exportPipeline"], "context.Parameters[\"exportPipeline\"]");
            Assert.ArgumentNotNullOrEmpty(context.Parameters["progressDialogTitle"], "context.Parameters[\"progressDialogTitle\"]");
            FileName = context.Parameters["fileName"];
            MimeType = context.Parameters["mimeType"];
            ExportPipeline = context.Parameters["exportPipeline"];
            ProgressDialogTitle = context.Parameters["progressDialogTitle"];
        }

        protected override string GetName()
        {
            return ProgressDialogTitle;
        }

        protected override string GetProcessorName()
        {
            return ExportPipeline;
        }

        private string FileName { get; set; }

        private string MimeType { get; set; }

        private string ExportPipeline { get; set; }

        private string ProgressDialogTitle { get; set; }
    }
}
I modeled the above command after Sitecore.Forms.Core.Commands.Export.ExportToExcel in Sitecore.Forms.Core.dll: this command inherits some useful logic of Sitecore.Forms.Core.Commands.Export.ExportToXml but differs along the pipeline being invoked, the name of the export file, and content type of the file being created.
I decided to make the above command be generic: the name of the file, pipeline, progress dialog title — this is a heading that is displayed in a modal dialog that is launched when the data is being exported from the Form Reports — and content type of the file are passed to it from Sitecore via Sheer UI buttons (see below).
I then registered all of the above in Sitecore via the following patch configuration file:
<?xml version="1.0" encoding="utf-8"?>
<configuration xmlns:patch="http://www.sitecore.net/xmlconfig/">
  <sitecore>
    <commands>
      <command name="forms:export" type="Sitecore.Sandbox.Forms.Core.Commands.Export.Export, Sitecore.Sandbox" />
    </commands>
    <pipelines>
      <exportToCsv>
        <processor type="Sitecore.Sandbox.Form.Core.Pipelines.Export.Csv.ExportToCsv, Sitecore.Sandbox" />
        <processor type="Sitecore.Form.Core.Pipelines.Export.SaveContent, Sitecore.Forms.Core" />
      </exportToCsv>
    </pipelines>
  </sitecore>
</configuration>
Now we must wire the command to Sheer UI buttons. This is how I wired up the export ‘All’ button (this button is available in a dropdown of the main export button in the Form Reports):

I then created another export button which is used when exporting selected rows in the Form Reports:

Let’s see this in action!
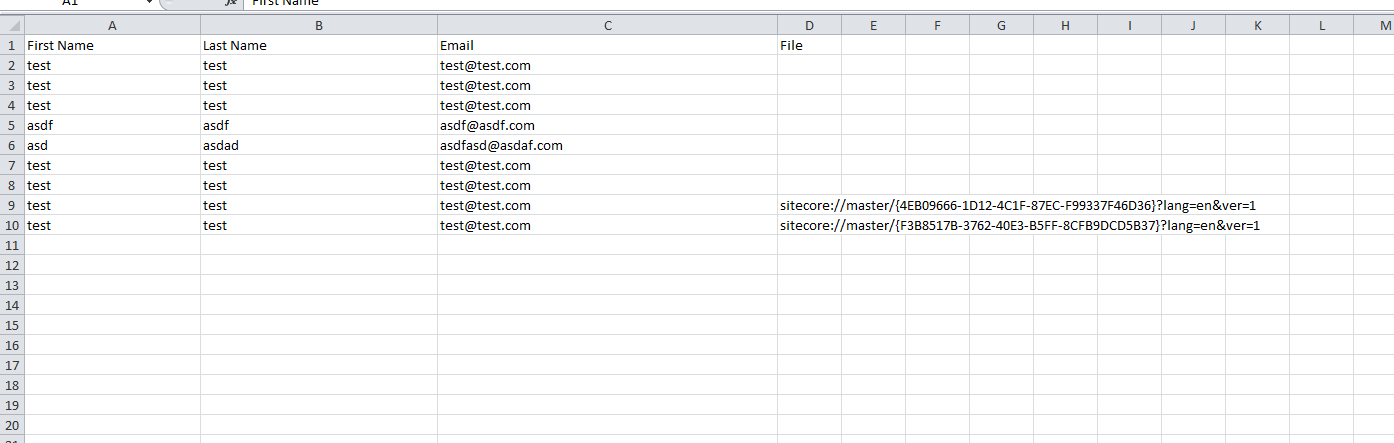
I opened up the Form Reports for a test form I had built for a previous blog post, and selected some rows (notice the ‘To CSV’ button in the ribbon):

I clicked the ‘To CSV’ button — doing this launched a progress dialog (I wasn’t fast enough to grab a screenshot of it) — and was prompted to download the following file:

As you can see, the file looks beautiful in Excel 😉 :
If you have any thoughts on this, or ideas for other export data formats that could be incorporated into the Form Reports of Web Forms for Marketers, please share in a comment.
Until next time, have a Sitecoretastic day!
Restrict IP Access of Directories and Files in Your Sitecore Web Application Using a httpRequestBegin Pipeline Processor
Last week my friend and colleague Greg Coffman had asked me if I knew of a way to restrict IP access to directories within the Sitecore web application, and I recalled reading a post by Alex Shyba quite some time ago.
Although Alex’s solution is probably good enough in most circumstances, I decided to explore other solutions, and came up with the following <httpRequestBegin> pipeline processor as another way to accomplish this:
using System;
using System.Collections.Generic;
using System.Linq;
using System.Web.Hosting;

using Sitecore.Configuration;
using Sitecore.Diagnostics;
using Sitecore.Pipelines.HttpRequest;
using Sitecore.Web;

namespace Sitecore.Sandbox.Pipelines.HttpRequest
{
    public class FilePathRestrictor : HttpRequestProcessor
    {
        public override void Process(HttpRequestArgs args)
        {
            Assert.ArgumentNotNull(args, "args");
            if (!ShouldRedirect(args))
            {
                return;
            }

            RedirectToNoAccessUrl();
        }

        private bool ShouldRedirect(HttpRequestArgs args)
        {
            return CanProcess(args, GetFilePath(args))
                    && !CanAccess(args.Context.Request.UserHostAddress);
        }

        protected virtual string GetFilePath(HttpRequestArgs args)
        {
            if (string.IsNullOrWhiteSpace(Context.Page.FilePath))
            {
                return args.Url.FilePath;
            }

            return Context.Page.FilePath;
        }

        protected virtual bool CanProcess(HttpRequestArgs args, string filePath)
        {
            return !string.IsNullOrWhiteSpace(filePath)
                    && !string.IsNullOrWhiteSpace(RootFilePath)
                    && AllowedIPs != null
                    && AllowedIPs.Any()
                    && (HostingEnvironment.VirtualPathProvider.DirectoryExists(filePath)
                        || HostingEnvironment.VirtualPathProvider.FileExists(filePath))
                    && args.Url.FilePath.StartsWith(RootFilePath, StringComparison.CurrentCultureIgnoreCase)
                    && !string.IsNullOrWhiteSpace(args.Context.Request.UserHostAddress)
                    && !string.Equals(filePath, Settings.NoAccessUrl, StringComparison.CurrentCultureIgnoreCase);
        }

        protected virtual bool CanAccess(string ip)
        {
            Assert.ArgumentNotNullOrEmpty(ip, "ip");
            return AllowedIPs.Contains(ip);
        }

        protected virtual void RedirectToNoAccessUrl()
        {
            WebUtil.Redirect(Settings.NoAccessUrl);
        }

        protected virtual void AddAllowedIP(string ip)
        {
            if (string.IsNullOrWhiteSpace(ip) || AllowedIPs.Contains(ip))
            {
                return;
            }

            AllowedIPs.Add(ip);
        }

        private string RootFilePath { get; set; }

        private IList<string> _AllowedIPs;
        private IList<string> AllowedIPs
        {
            get
            {
                if (_AllowedIPs == null)
                {
                    _AllowedIPs = new List<string>();
                }

                return _AllowedIPs;
            }
        }
    }
}
The pipeline processor above determines whether the IP making the request has access to the directory or file on the file system — a list of IP addresses that should have access are passed to the pipeline processor via a configuration file, and the code does check to see if the requested URL is a directory or a file on the file system — by matching the beginning of the URL with a configuration defined root path.
If the user does not have access to the requested path, s/he is redirected to the “No Access Url” which is specified in the Sitecore instance’s configuration.
The list of IP addresses that should have access to the directory — including everything within it — and the root path are handed to the pipeline processor via the following patch configuration file:
<?xml version="1.0" encoding="utf-8" ?>
<configuration xmlns:patch="http://www.sitecore.net/xmlconfig/">
  <sitecore>
    <pipelines>
      <httpRequestBegin>
        <processor patch:before=" processor[@type='Sitecore.Pipelines.HttpRequest.FileResolver, Sitecore.Kernel']"
                   type="Sitecore.Sandbox.Pipelines.HttpRequest.FilePathRestrictor, Sitecore.Sandbox">
          <RootFilePath>/sitecore</RootFilePath>
          <AllowedIPs hint="list:AddAllowedIP">
            <IP>127.0.0.2</IP>
          </AllowedIPs>
        </processor>
      </httpRequestBegin>
    </pipelines>
  </sitecore>
</configuration>
Since my IP is 127.0.0.1, I decided to only allow 127.0.0.2 access to my Sitecore directory — this also includes everything within it — in the above configuration file for testing.
After navigating to /sitecore of my local sandbox instance, I was redirected to the “No Access Url” page defined in my Web.config:

If you have any thoughts on this, or know of other solutions, please share in a comment.
Add the HTML5 Range Input Control into Web Forms for Marketers in Sitecore
A couple of weeks ago, I was researching what new input controls exist in HTML5 — I am quite a dinosaur when it comes to front-end code, and felt it was a good idea to see what is currently available or possible — and discovered the range HTML control:

I immediately wanted to add this HTML5 input control into Web Forms for Marketers in Sitecore, and built the following control class as a proof of concept:
using System;
using System.Web.UI;
using System.Web.UI.WebControls;

using Sitecore.Diagnostics;
using Sitecore.Form.Web.UI.Controls;

namespace Sitecore.Sandbox.Form.Web.UI.Controls
{
    public class Range : InputControl
    {
        public Range() : this(HtmlTextWriterTag.Div)
        {
        }

        public Range(HtmlTextWriterTag tag)
            : base(tag)
        {
        }

        protected override void OnInit(EventArgs e)
        {
            base.textbox.CssClass = "scfSingleLineTextBox";
            base.help.CssClass = "scfSingleLineTextUsefulInfo";
            base.generalPanel.CssClass = "scfSingleLineGeneralPanel";
            base.title.CssClass = "scfSingleLineTextLabel";
            this.Controls.AddAt(0, base.generalPanel);
            this.Controls.AddAt(0, base.title);
            base.generalPanel.Controls.AddAt(0, base.help);
            base.generalPanel.Controls.AddAt(0, textbox);
        }

        protected override void DoRender(HtmlTextWriter writer)
        {
            textbox.Attributes["type"] = "range";
            TrySetIntegerAttribute("min", MinimumValue);
            TrySetIntegerAttribute("max", MaximumValue);
            TrySetIntegerAttribute("step", StepInterval);
            EnsureDefaultValue();
            textbox.MaxLength = 0;
            base.DoRender(writer);
        }

        protected virtual void TrySetIntegerAttribute(string attributeName, string value)
        {
            int integerValue;
            if (int.TryParse(value, out integerValue))
            {
                SetAttribute(attributeName, integerValue.ToString());
            }
        }

        protected virtual void SetAttribute(string attributeName, string value)
        {
            Assert.ArgumentNotNull(textbox, "textbox");
            Assert.ArgumentNotNullOrEmpty(attributeName, "attributeName");
            textbox.Attributes[attributeName] = value;
        }

        protected virtual void EnsureDefaultValue()
        {
            int value;
            if (!int.TryParse(Text, out value))
            {
                textbox.Text = string.Empty;
            }
        }

        public string MinimumValue { get; set; }

        public string MaximumValue { get; set; }

        public string StepInterval { get; set; }
    }
}
Most of the magic behind how this works occurs in the DoRender() method above. In that method we are changing the “type” attribute on the TextBox instance defined in the parent InputControl class to be “range” instead of “text”: this is how the browser will know that it is to render a range control instead of a textbox.
The DoRender() method also delegates to other helper methods: one to set the default value for the control, and another to add additional attributes to our control — the “step”, “min”, and “max” attributes in particular (you can learn more about these attributes by reading this specification for the range control) — and these are only set when values are passed to our code via XML defined in Sitecore for the control:

Let’s test this out!
I whipped up a test form, and added a range field to it:

This is what the form looked like on the page before I clicked the submit button (trust me, that’s 75 😉 ):

After clicking submit, I was given a confirmation message:

As you can see in the Form Reports for our test form, the value selected on the range control was captured:

I will admit that I had a lot of fun adding this range input control into Web Forms for Marketers but do question whether anyone would use this control.
Why?
I found no way to add label markers for the different values on the control (if you are aware of a way to do this, please leave a comment).
Also, it should be noted that this control will not work in Internet Explorer 9 or earlier versions.
If you can think of ways around making this better, or have ideas for other HTML5 controls that could/should be added to Web Forms for Marketers, please share in a comment.
Restrict Certain Files from Being Attached to Web Forms for Marketers Forms in Sitecore
Last week I was given a task to research how to prevent certain files from being attached to Web Forms for Marketers (WFFM) forms: basically files that have certain extensions, or files that exceed a specified size.
I have not seen this done before in WFFM, so I did what comes naturally to me: I Googled! 🙂
After a few unsuccessful searches on the internet — if you have some examples on how others have accomplished this in WFFM, please share in a comment — I decided to dig into the WFFM assemblies to see what would be needed to accomplish this, and felt using custom WFFM field validators would be the way to go.
I thought having a custom validator to check the attached file’s MIME type would be a better solution over one that checks the file’s extension — thanks to Sitecore MVP Yogesh Patel for giving me the idea from his post on restricting certain files from being uploading into Sitecore by checking their MIME types — since a malefactor could attach a restricted file with a different extension to bypass the extension validation step.
That thought lead me to build the following custom WFFM field validator:
using System;
using System.Collections.Generic;
using System.Linq;
using System.Web.UI.WebControls;

using Sitecore.Form.Core.Validators;
using Sitecore.Form.Web.UI.Controls;

namespace Sitecore.Sandbox.Form.Core.Validators
{
    public class RestrictedFileTypes : FormCustomValidator
    {
        public string MimeTypesNotAllowed
        {
            get
            {
                if (string.IsNullOrWhiteSpace(base.classAttributes["mimeTypesNotAllowed"]))
                {
                    return string.Empty;
                }

                return base.classAttributes["mimeTypesNotAllowed"];
            }
            set
            {
                base.classAttributes["mimeTypesNotAllowed"] = value;
            }
        }

        public RestrictedFileTypes()
        {
        }

        protected override bool OnServerValidate(string value)
        {
            IEnumerable<string> mimeTypesNotAllowed = GetMimeTypesNotAllowed();
            FileUpload fileUpload = FindControl(ControlToValidate) as FileUpload;
            bool canProcess = mimeTypesNotAllowed.Any() && fileUpload != null && fileUpload.HasFile;
            if (!canProcess)
            {
                return true;
            }

            foreach(string mimeType in mimeTypesNotAllowed)
            {
                if (AreEqualIgnoreCase(mimeType, fileUpload.PostedFile.ContentType))
                {
                    return false;
                }
            }

            return true;
        }

        private IEnumerable<string> GetMimeTypesNotAllowed()
        {
            if (string.IsNullOrWhiteSpace(MimeTypesNotAllowed))
            {
                return new List<string>();
            }

            return MimeTypesNotAllowed.Split(new []{',', ';'}, StringSplitOptions.RemoveEmptyEntries);
        }

        private static bool AreEqualIgnoreCase(string stringOne, string stringTwo)
        {
            return string.Equals(stringOne, stringTwo, StringComparison.CurrentCultureIgnoreCase);
        }
    }
}
Restricted MIME types are passed to the custom validator through a parameter named MimeTypesNotAllowed, and these are injected into a property of the same name.
The MIME types can be separated by commas or semicolons, and the code above splits the string along these delimiters into a collection, checks to see if the uploaded file — we get the uploaded file via the FileUpload control on the form for the field we are validating — has a restricted MIME type by iterating over the collection of restricted MIME types, and comparing each entry to its MIME type. If there is a match, we return “false”: basically the field is invalid.
If no MIME types were set for the validator, or no file was uploaded, we return “true”: the field is valid. We do this for the case where the field is not required, or there is a required field validator set for it, and we don’t want to interfere with its validation check.
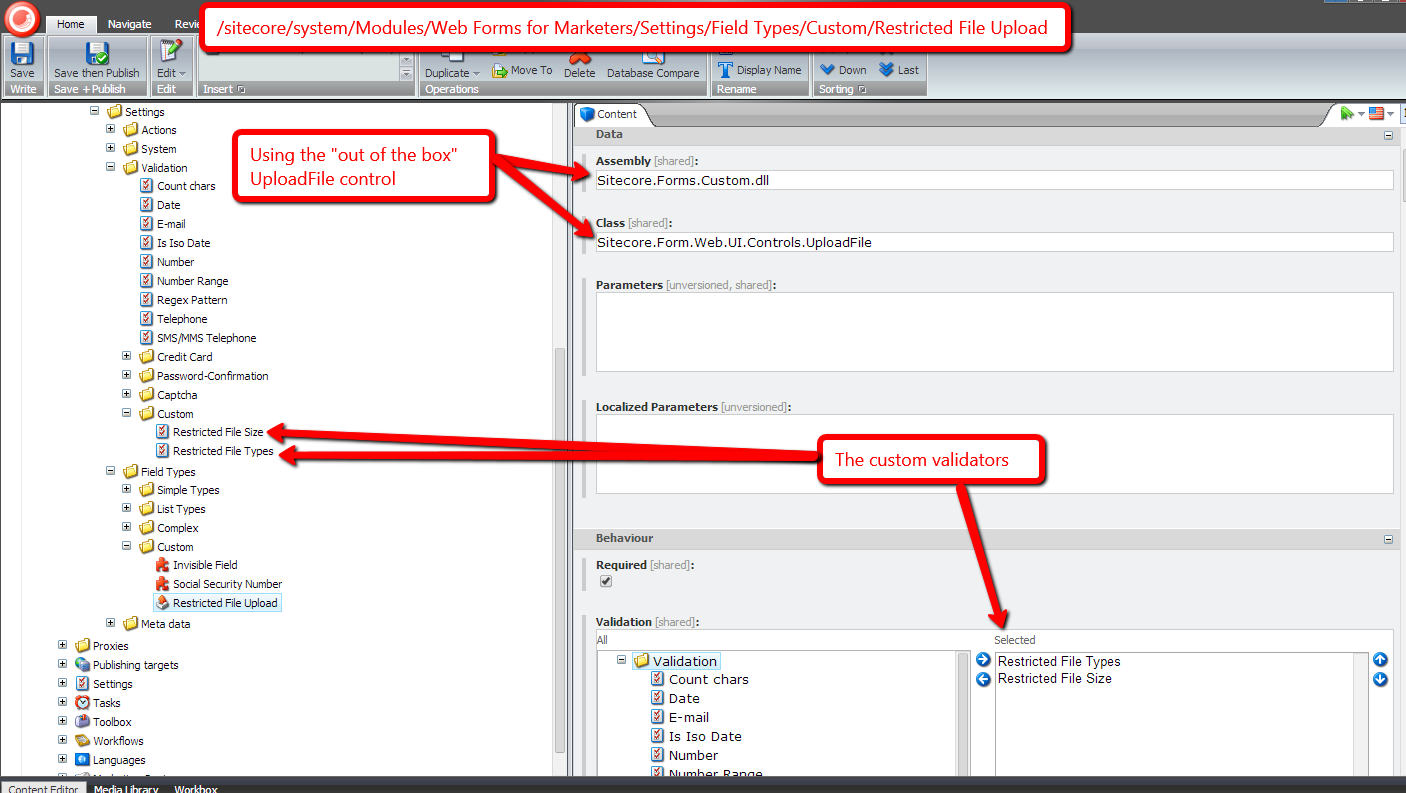
I then mapped the above validator in Sitecore:

After saving the above validator Item in Sitecore, I built the following validator class to check to see if a file exceeds a certain size:
using System;
using System.Collections.Generic;
using System.Linq;
using System.Web.UI.WebControls;

using Sitecore.Form.Core.Validators;
using Sitecore.Form.Web.UI.Controls;

namespace Sitecore.Sandbox.Form.Core.Validators
{
    public class RestrictedFileSize : FormCustomValidator
    {
        public int MaxFileSize
        {
            get
            {
                int maxSize;
                if (int.TryParse(base.classAttributes["mimeTypesNotAllowed"], out maxSize))
                {
                    return maxSize;
                }

                return 0;
            }
            set
            {
                base.classAttributes["mimeTypesNotAllowed"] = value.ToString();
            }
        }

        public RestrictedFileSize()
        {
        }

        protected override bool OnServerValidate(string value)
        {
            FileUpload fileUpload = FindControl(ControlToValidate) as FileUpload;
            if (!fileUpload.HasFile)
            {
                return true;
            }

            return fileUpload.PostedFile.ContentLength <= MaxFileSize;
        }
    }
}
Just as we had done in the other validator, we grab the FileUpload from the form, and see if there is a file attached. If there is no file attached, we return “true”: we don’t want to say the field is invalid when the field is not required.
We then return whether the uploaded file is less than or equal to the specified maximum size in bytes — this is set on a parameter named MaxFileSize which gets injected into the MaxFileSize property of the validator instance.
I then registered the above validator in Sitecore:

I then decided to create a custom WFFM field type for the purposes of mapping our validators above, so that we don’t enforce these restrictions on the “out of the box” WFFM “File Upload” field type:
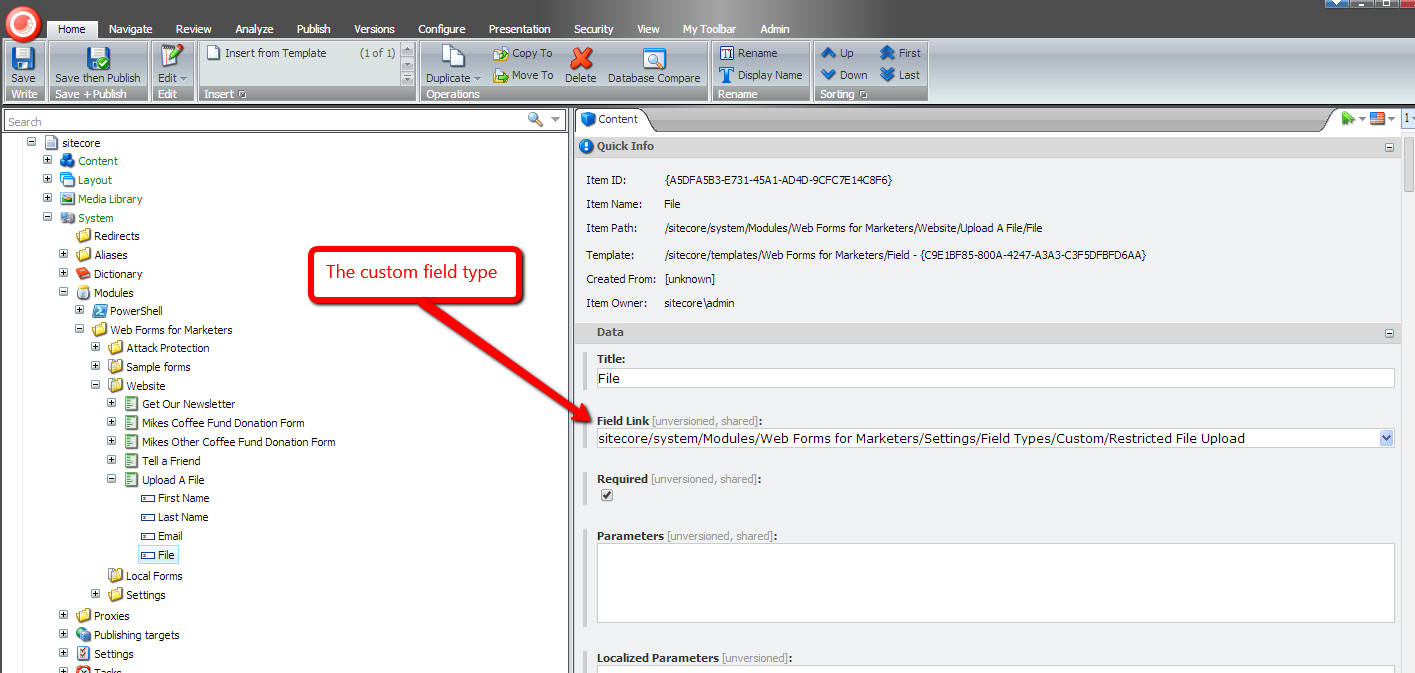
I then set the new field type on a file field I added to a test WFFM form:
Let’s see how we did!
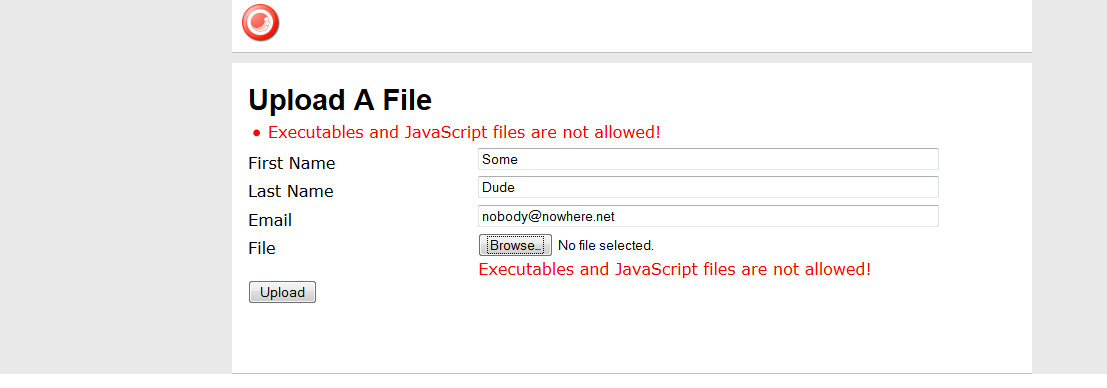
Let’s try to upload an executable that exceeds the maximum upload size limit:

As you can see both validators were triggered for this file:

How about a JavaScript file? Let’s try to attach one:

Nope, we can’t attach that file either:
How about an image that is larger than the size limit? Let’s try one:

Nope, we can’t upload that either:

Let’s try an image that is under 100KB:

Yes, we can attach that file since it’s not restricted, and the form did submit:

If you have any thoughts on this, or other ideas around preventing certain files from being attached to WFFM form submissions, please share in a comment.
Embedded Tweets in Sitecore: A Proof of Concept
In a previous post, I showcased a “proof of concept” for shortcodes in Sitecore — this is a shorthand notation for embedding things like YouTube videos in your webpages without having to type up a bunch of HTML — and felt I should follow up with another “proof of concept” around incorporating Embedded Tweets in Sitecore.
You might be asking “what’s an Embedded Tweet?” An Embedded Tweet is basically the process of pasting a Tweet URL from Twitter into an editable content area of your website/blog/whatever (think Rich Text field in Sitecore), and let the code that builds the HTML for your site figure out how to display it.
For example, I had used an Embedded Tweet in a recent post:

This is what is seen on the rendered page:

While doing some research via Google on how to do this in Sitecore, I found this page from Twitter that discusses how you could go about accomplishing this, and discovered how to get JSON containing information about a Tweet — including its HTML — using one of Twitter’s API URLs:

The JSON above drove me to build the following POCO class to represent data returned by that URL:
using System.Runtime.Serialization;

namespace Sitecore.Sandbox.Pipelines.RenderField.Tweets
{
    public class Tweet
    {
        [DataMember(Name = "cache_age")]
        public int CacheAgeMilliseconds { get; set; }

        [DataMember(Name = "url")]
        public string Url { get; set; }

        [DataMember(Name = "html")]
        public string Html { get; set; }
    }
}
I decided to omit some of the JSON properties returned by the Twitter URL from my class above — width and height are examples — since I felt I did not need to use them for this “proof of concept”.
I then leveraged the class above in the following class that will serve as a <renderField> pipeline processor to embed Tweets:
using System;
using System.IO;
using System.Net;
using System.Text.RegularExpressions;
using System.Web;

using Sitecore.Caching;
using Sitecore.Diagnostics;
using Sitecore.Pipelines.RenderField;

using Newtonsoft.Json;
using Newtonsoft.Json.Linq;

namespace Sitecore.Sandbox.Pipelines.RenderField.Tweets
{
    public class ExpandTweets
    {
        private string TwitterWidgetScriptTag {get ; set; }

        private string TwitterApiUrlFormat { get; set; }

        private string _TweetPattern;
        private string TweetPattern
        {
            get
            {
                return _TweetPattern;
            }
            set
            {
                _TweetPattern = value;
                if (!string.IsNullOrWhiteSpace(_TweetPattern))
                {
                    _TweetPattern = HttpUtility.HtmlDecode(_TweetPattern);
                }
            }
        }

        private HtmlCache _HtmlCache;
        private HtmlCache HtmlCache
        {
            get
            {
                if (_HtmlCache == null)
                {
                    _HtmlCache = CacheManager.GetHtmlCache(Context.Site);
                }

                return _HtmlCache;
            }
        }

        public void Process(RenderFieldArgs args)
        {
            Assert.ArgumentNotNull(args, "args");
            AssertRequired();
            if(!ShouldFieldBeProcessed(args))
            {
                return;
            }

            args.Result.FirstPart = ExpandTweetUrls(args.Result.FirstPart);
        }

        private static bool ShouldFieldBeProcessed(RenderFieldArgs args)
        {
            Assert.ArgumentNotNull(args, "args");
            Assert.ArgumentNotNull(args.FieldTypeKey, "args.FieldTypeKey");
            string fieldTypeKey = args.FieldTypeKey.ToLower();
            return fieldTypeKey == "text"
                    || fieldTypeKey == "rich text"
                    || fieldTypeKey == "single-line text"
                    || fieldTypeKey == "multi-line text";
        }

        private void AssertRequired()
        {
            Assert.IsNotNullOrEmpty(TwitterWidgetScriptTag, "TwitterWidgetScriptTag must be set! Check your configuration!");
            Assert.IsNotNullOrEmpty(TwitterApiUrlFormat, "TwitterApiUrlFormat must be set! Check your configuration!");
            Assert.IsNotNullOrEmpty(TweetPattern, "TweetPattern must be set! Check your configuration!");
        }

        protected virtual string ExpandTweetUrls(string html)
        {
            string htmlExpanded = html;
            MatchCollection matches = Regex.Matches(htmlExpanded, TweetPattern, RegexOptions.Compiled | RegexOptions.IgnoreCase);
            foreach (Match match in matches)
            {
                string tweetHtml = GetTweetHtml(match.Groups["id"].Value);
                if (!string.IsNullOrWhiteSpace(tweetHtml))
                {
                    htmlExpanded = htmlExpanded.Replace(match.Value, tweetHtml);
                }
            }

            if (matches.Count > 0)
            {
                htmlExpanded = string.Concat(htmlExpanded, TwitterWidgetScriptTag);
            }

            return htmlExpanded;
        }

        protected virtual string GetTweetHtml(string id)
        {
            string html = GetTweetHtmlFromCache(id);
            if (!string.IsNullOrWhiteSpace(html))
            {
                return html;
            }

            Tweet tweet = GetTweetFromApi(id);
            AddTweetHtmlToCache(id, tweet);
            return tweet.Html;
        }

        private string GetTweetHtmlFromCache(string id)
        {
            return HtmlCache.GetHtml(id);
        }

        private void AddTweetHtmlToCache(string id, Tweet tweet)
        {
            if (string.IsNullOrWhiteSpace(tweet.Html))
            {
                return;
            }

            if (tweet.CacheAgeMilliseconds > 0)
            {
                HtmlCache.SetHtml(id, tweet.Html, DateTime.Now.AddMilliseconds(tweet.CacheAgeMilliseconds));
                return;
            }

            HtmlCache.SetHtml(id, tweet.Html);
        }

        protected virtual Tweet GetTweetFromApi(string id)
        {
            HttpWebRequest request = (HttpWebRequest)WebRequest.Create(string.Format(TwitterApiUrlFormat, id));
            try
            {
                HttpWebResponse response = (HttpWebResponse)request.GetResponse();
                using (StreamReader reader = new StreamReader(response.GetResponseStream()))
                {
                    var result = reader.ReadToEnd();
                    JObject jObject = JObject.Parse(result);
                    return JsonConvert.DeserializeObject<Tweet>(jObject.ToString());
                }
            }
            catch (Exception ex)
            {
                Log.Error(this.ToString(), ex, this);
            }

            return new Tweet { Html = string.Empty };
        }
    }
}
Methods in the class above find all Tweet URLs in the Rich Text, Single-Line Text, or Multi-Line Text field being processed — the code determines if it’s a Tweet URL based on a pattern that is supplied by a configuration setting (you will see this below in this post); extract Tweets’ Twitter identifiers (these are located at the end of the Tweet URLs); and attempt to find the Tweets’ HTML in Sitecore’s HTML cache.
If the HTML is found in cache for a Tweet, we return it. Otherwise, we make a request to Twitter’s API to get it, put it in cache one we have it (it is set to expire after a specified number of milliseconds from the time it was retrieved: Twitter returns the number of milliseconds in one full year by default), and then we return it.
If the returned HTML is not empty, we replace it in the field’s value for display.
If the HTML returned is empty — this could happen when an exception is encountered during the Twitter API call (of course we log the exception in the Sitecore log when this happens 😉 ) — we don’t touch the Tweet URL in the field’s value.
Once all Tweet URLs have been processed, we append a script tag referencing Twitter’s widget.js file — this is supplied through a configuration setting, and it does the heavy lifting on making the Tweet HTML look Twitterific 😉 — to the field’s rendered HTML.
I then tied everything together using the following patch configuration file:
<?xml version="1.0" encoding="utf-8"?>
<configuration xmlns:patch="http://www.sitecore.net/xmlconfig/">
<sitecore>
<pipelines>
<renderField>
<processor type="Sitecore.Sandbox.Pipelines.RenderField.Tweets.ExpandTweets, Sitecore.Sandbox"
patch:after="processor[@type='Sitecore.Pipelines.RenderField.GetTextFieldValue, Sitecore.Kernel']">
<TwitterWidgetScriptTag><script async src="//platform.twitter.com/widgets.js" charset="utf-8"></script></TwitterWidgetScriptTag>
<TwitterApiUrlFormat>https://api.twitter.com/1/statuses/oembed.json?id={0}&omit_script=true</TwitterApiUrlFormat>
<TweetPattern>https://twitter.com/.+/status/(?<id>\d*)</TweetPattern>
</processor>
</renderField>
</pipelines>
</sitecore>
</configuration>
Let’s see this in action!
I created a test Item, and added some legitimate and bogus Tweet URLs into one of its Rich Text fields (please pardon the grammatical issues in the following screenshots :-/):

This isn’t the most aesthetically pleasing HTML, but it will serve its purpose for testing:
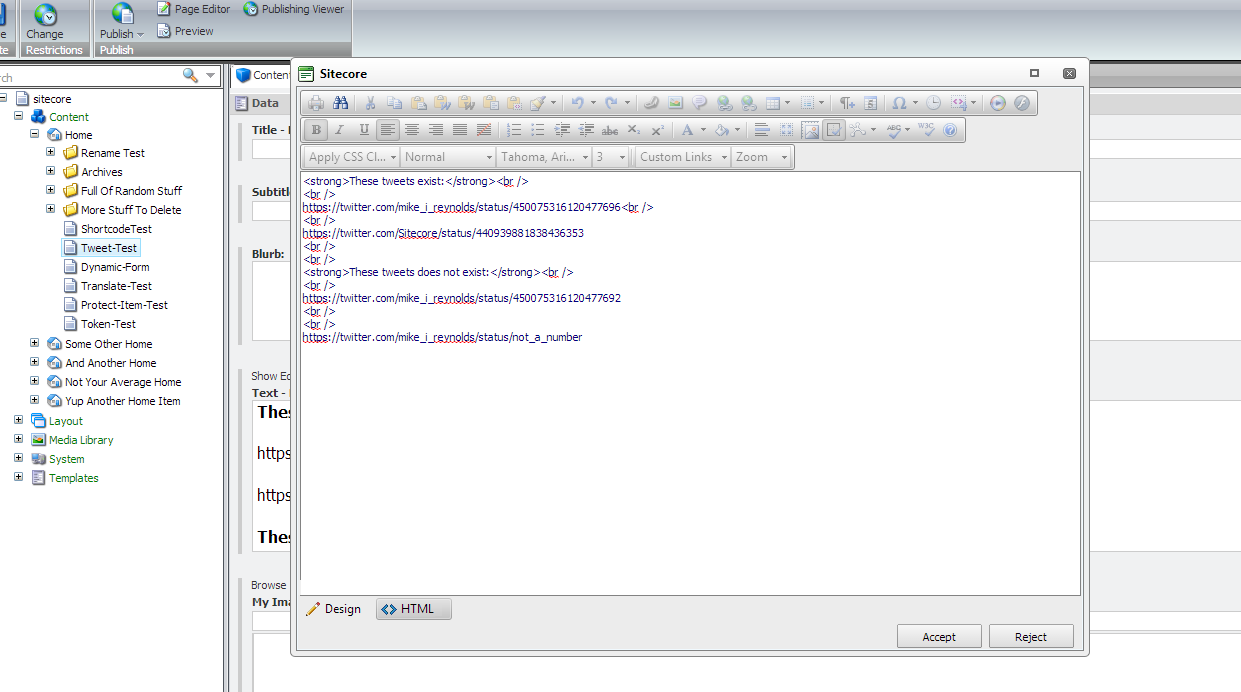
After saving and publishing, I navigated to my test Item’s page, and saw this:

If you have any suggestions on making this better, or have other ideas for embedding Tweets in Sitecore, please share in a comment.
Add Sitecore Rocks Commands to Protect and Unprotect Items
The other day I read this post where the author showcased a new Clipboard command he had added into Sitecore Rocks, and immediately wanted to experiment with adding my own custom command into Sitecore Rocks.
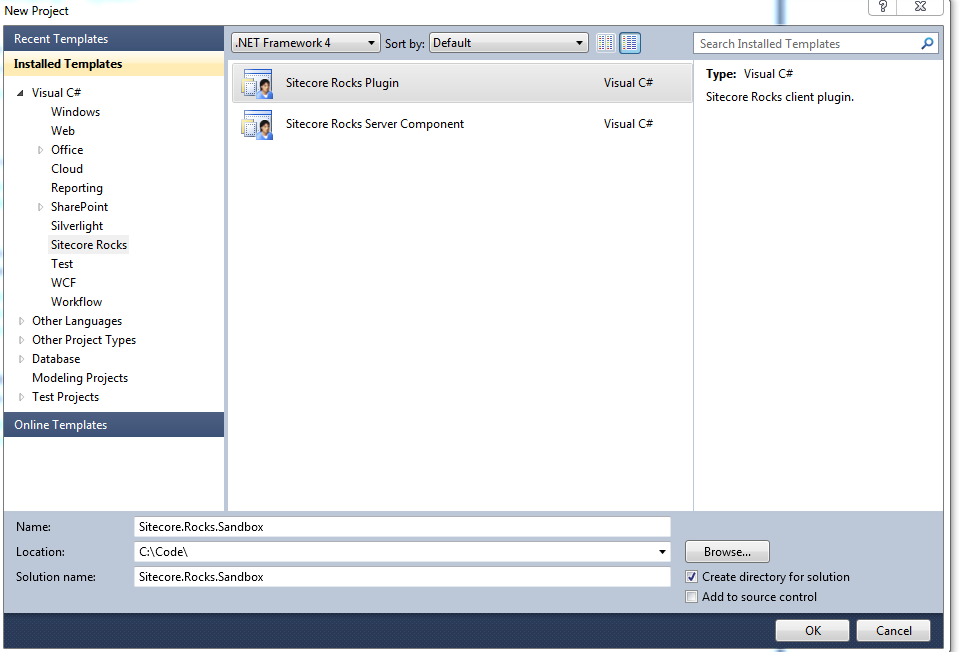
After some research, I stumbled upon this post which gave a walk-through on augmenting Sitecore Rocks by adding a Server Component — this is an assembled library of code for your Sitecore instance to handle requests from Sitecore Rocks — and a Plugin — this is an assembled library of code that can contain custom commands — and decided to follow its lead.
I first created a Sitecore Rocks Server Component project in Visual Studio:

After some pondering, I decided to ‘cut my teeth’ on creating custom commands to protect and unprotect Items in Sitecore (for more information on protecting/unprotecting Items in Sitecore, check out ‘How to Protect or Unprotect an Item’ in Sitecore’s Client Configuration
Cookbook).
I decided to use the template method pattern for the classes that will handle requests from Sitecore Rocks — I envisioned some shared logic across the two — and put this shared logic into the following base class:
using Sitecore.Configuration;
using Sitecore.Data;
using Sitecore.Data.Items;
using Sitecore.Diagnostics;

namespace Sitecore.Rocks.Server.Requests
{
    public abstract class EditItem
    {
        public string Execute(string id, string databaseName)
        {
            Assert.ArgumentNotNullOrEmpty(id, "id");
            return ExecuteEditItem(GetItem(id, databaseName));
        }

        private string ExecuteEditItem(Item item)
        {
            Assert.ArgumentNotNull(item, "item");
            item.Editing.BeginEdit();
            string response = UpdateItem(item);
            item.Editing.EndEdit();
            return response;
        }

        protected abstract string UpdateItem(Item item);

        private static Item GetItem(string id, string databaseName)
        {
            Assert.ArgumentNotNullOrEmpty(id, "id");
            Database database = GetDatabase(databaseName);
            Assert.IsNotNull(database, string.Format("database: {0} does not exist!", databaseName));
            return database.GetItem(id);
        }

        private static Database GetDatabase(string databaseName)
        {
            Assert.ArgumentNotNullOrEmpty(databaseName, "databaseName");
            return Factory.GetDatabase(databaseName);
        }
    }
}
The EditItem base class above gets the Item in the requested database, and puts the Item into edit mode. It then passes the Item to the UpdateItem method — subclasses must implement this method — and then turns off edit mode for the Item.
As a side note, all Server Component request handlers must have a method named Execute.
For protecting a Sitecore item, I built the following subclass of the EditItem class above:
using Sitecore.Data.Items;

namespace Sitecore.Rocks.Server.Requests.Attributes
{
    public class ProtectItem : EditItem
    {
        protected override string UpdateItem(Item item)
        {
            item.Appearance.ReadOnly = true;
            return string.Empty;
        }
    }
}
The ProtectItem class above just protects the Item passed to it.
I then built the following subclass of EditItem to unprotect an item passed to its UpdateItem method:
using Sitecore.Data.Items;

namespace Sitecore.Rocks.Server.Requests.Attributes
{
    public class UnprotectItem : EditItem
    {
        protected override string UpdateItem(Item item)
        {
            item.Appearance.ReadOnly = false;
            return string.Empty;
        }
    }
}
I built the above Server Component solution, and put its resulting assembly into the /bin folder of my Sitecore instance.
I then created a Plugin solution to handle the protect/unprotect commands in Sitecore Rocks:
I created the following command to protect a Sitecore Item:
using System;
using System.Linq;

using Sitecore.VisualStudio.Annotations;
using Sitecore.VisualStudio.Commands;
using Sitecore.VisualStudio.Data;
using Sitecore.VisualStudio.Data.DataServices;

using SmartAssembly.SmartExceptionsCore;

namespace Sitecore.Rocks.Sandbox.Commands
{
    [Command]
    public class ProtectItemCommand : CommandBase
    {
        public ProtectItemCommand()
        {
            Text = "Protect Item";
            Group = "Edit";
            SortingValue = 4010;
        }

        public override bool CanExecute([CanBeNull] object parameter)
        {
            IItemSelectionContext context = null;
            bool canExecute = false;
            try
            {
                context = parameter as IItemSelectionContext;
                canExecute = context != null && context.Items.Count() == 1 && !IsProtected(context.Items.FirstOrDefault());
            }
            catch (Exception ex)
            {
                StackFrameHelper.CreateException3(ex, context, this, parameter);
                throw;
            }

            return canExecute;
        }

        private static bool IsProtected(IItem item)
        {
            ItemVersionUri itemVersionUri = new ItemVersionUri(item.ItemUri, LanguageManager.CurrentLanguage, Sitecore.VisualStudio.Data.Version.Latest);
            Item item2 = item.ItemUri.Site.DataService.GetItemFields(itemVersionUri);
            foreach (Field field in item2.Fields)
            {
                if (string.Equals("__Read Only", field.Name, StringComparison.CurrentCultureIgnoreCase) && field.Value == "1")
                {
                    return true;
                }
            }

            return false;
        }

        public override void Execute([CanBeNull] object parameter)
        {
            IItemSelectionContext context = null;
            try
            {
                context = parameter as IItemSelectionContext;
                IItem item = context.Items.FirstOrDefault();
                item.ItemUri.Site.DataService.ExecuteAsync
                (
                    "Attributes.ProtectItem",
                    CreateEmptyCallback(),
                    new object[]
                    {
	                    item.ItemUri.ItemId.ToString(),
	                    item.ItemUri.DatabaseName.ToString()
                    }
                );
            }
            catch (Exception ex)
            {
                StackFrameHelper.CreateException3(ex, context, this, parameter);
                throw;
            }
        }

        private ExecuteCompleted CreateEmptyCallback()
        {
            return (response, executeResult) => { return; };
        }
    }
}
The ProtectItemCommand command above is only displayed when the selected Item is not protected — this is ascertained by logic in the CanExecute method — and fires off a request to the Sitecore.Rocks.Server.Requests.Attributes.ProtectItem request handler in the Server Component above to protect the selected Item.
I then built the following command to do the exact opposite of the command above: only appear when the selected Item is protected, and make a request to Sitecore.Rocks.Server.Requests.Attributes.UnprotectItem — shown above in the Server Component — to unprotect the selected Item:
using System;
using System.Linq;

using Sitecore.VisualStudio.Annotations;
using Sitecore.VisualStudio.Commands;
using Sitecore.VisualStudio.Data;
using Sitecore.VisualStudio.Data.DataServices;

using SmartAssembly.SmartExceptionsCore;

namespace Sitecore.Rocks.Sandbox.Commands
{
    [Command]
    public class UnprotectItemCommand : CommandBase
    {
        public UnprotectItemCommand()
        {
            Text = "Unprotect Item";
            Group = "Edit";
            SortingValue = 4020;
        }

        public override bool CanExecute([CanBeNull] object parameter)
        {
            IItemSelectionContext context = null;
            bool canExecute = false;
            try
            {
                context = parameter as IItemSelectionContext;
                canExecute = context != null && context.Items.Count() == 1 && IsProtected(context.Items.FirstOrDefault());
            }
            catch (Exception ex)
            {
                StackFrameHelper.CreateException3(ex, context, this, parameter);
                throw;
            }

            return canExecute;
        }

        private static bool IsProtected(IItem item)
        {
            ItemVersionUri itemVersionUri = new ItemVersionUri(item.ItemUri, LanguageManager.CurrentLanguage, Sitecore.VisualStudio.Data.Version.Latest);
            Item item2 = item.ItemUri.Site.DataService.GetItemFields(itemVersionUri);
            foreach (Field field in item2.Fields)
            {
                if (string.Equals("__Read Only", field.Name, StringComparison.CurrentCultureIgnoreCase) && field.Value == "1")
                {
                    return true;
                }
            }

            return false;
        }

        public override void Execute([CanBeNull] object parameter)
        {
            IItemSelectionContext context = null;
            try
            {
                context = parameter as IItemSelectionContext;
                IItem item = context.Items.FirstOrDefault();
                item.ItemUri.Site.DataService.ExecuteAsync
                (
                    "Attributes.UnprotectItem",
                    CreateEmptyCallback(),
                    new object[]
                    {
	                    item.ItemUri.ItemId.ToString(),
	                    item.ItemUri.DatabaseName.ToString()
                    }
                );
            }
            catch (Exception ex)
            {
                StackFrameHelper.CreateException3(ex, context, this, parameter);
                throw;
            }
        }

        private ExecuteCompleted CreateEmptyCallback()
        {
            return (response, executeResult) => { return; };
        }
    }
}
I had to do a lot of discovery in Sitecore.Rocks.dll via .NET Reflector in order to build the above commands, and had a lot of fun while searching and learning.
Unfortunately, I could not get the commands above to show up in the Sitecore Explorer context menu in my instance of Sitecore Rocks even though my plugin did make its way out to my C:\Users\[my username]\AppData\Local\Sitecore\Sitecore.Rocks\Plugins\ folder.
I troubleshooted for some time but could not determine why these commands were not appearing — if you have any ideas, please leave a comment — and decided to register my commands using Extensions in Sitecore Rocks as a fallback plan:
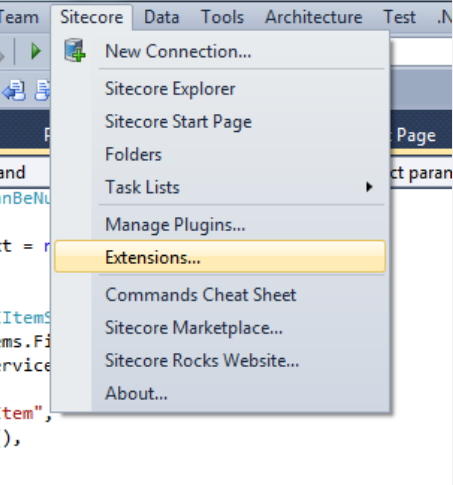
After clicking ‘Extensions’ in the Sitecore dropdown menu in Visual Studio, I was presented with the following dialog, and added my classes via the ‘Add’ button on the right:

Let’s see this in action.
I first created a Sitecore Item for testing:

I navigated to that Item in the Sitecore Explorer in Sitecore Rocks, and right-clicked on it:
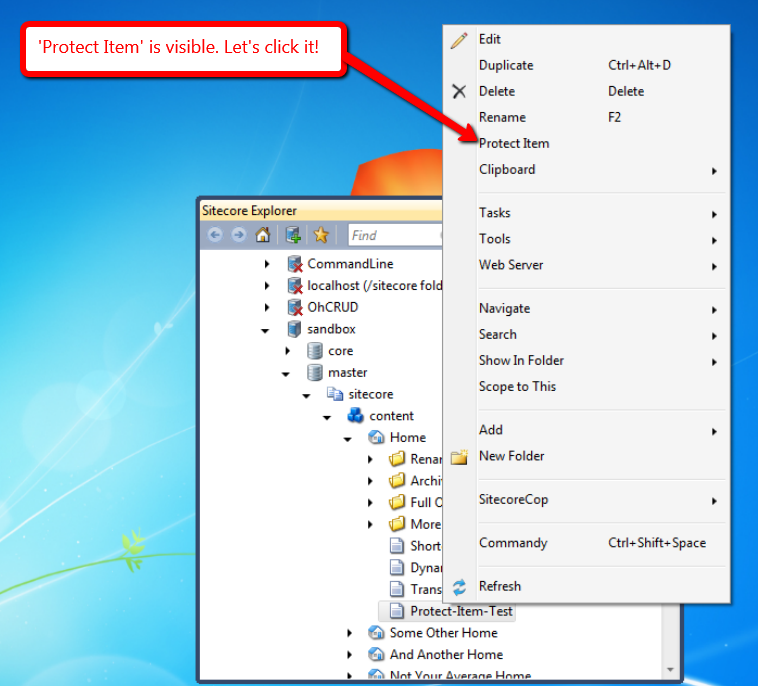
After clicking ‘Protect Item’, I verified the Item was protected in Sitecore:

I then went back to our test Item in the Sitecore Explorer of Sitecore Rocks, and right-clicked again:

After clicking ‘Unprotect Item’, I took a look at the Item in Sitecore, and saw that it was no longer protected:
If you have any thoughts on this, or ideas for other commands that you would like to see in Sitecore Rocks, please drop a comment.
Until next time, have a Sitecoretastic day, and don’t forget: Sitecore Rocks!
Synchronize IDTable Entries Across Multiple Sitecore Databases Using a Composite IDTableProvider
The other day Sitecore MVP Kyle Heon asked:
This tweet got the wheels turning — more like got the hamster wheel spinning in my head — and I began experimenting on ways to synchronize IDTable entries across different Sitecore databases.
In this post, I will show the first solution I had come up with — yes I’ve come up with two solutions to this although no doubt there are more (if you have ideas for other solutions, or have tackled this problem in the past, please share in a comment) — but before I show that solution, I’d like to explain what the IDTable in Sitecore is, and why you might want to use it.
Assuming you’re using SQL Server for Sitecore, the “out of the box” IDTable in Sitecore is a database table that lives in all Sitecore databases — though Sitecore’s prepackaged configuration only points to the IDTable in the master database.
One has the ability to store key/value pairs in this table in the event you don’t want to “roll your own” custom database table — or use some other data store — and don’t want to expose these key/value pair relationships in Items in Sitecore.
The key must be a character string, and the value must be a Sitecore Item ID.
Plus, one has the ability to couple these key/value pairs with “custom data” — this, like the key, is stored in the database as a string which makes it cumbersome around storing complex data structures (having some sort of serialization/deserialization paradigm in place would be required to make this work).
Alex Shyba showed how one could leverage the IDTable for URLs for fictitious products stored in Sitecore in this post, and this article employed the IDTable for a custom Data Provider.
If you would like to know more about the IDTable, please leave a comment, and I will devote a future post to it.
Let’s take a look at the first solution I came up with:
using System;
using System.Collections.Generic;
using System.Xml;

using Sitecore.Configuration;
using Sitecore.Data;
using Sitecore.Data.IDTables;
using Sitecore.Diagnostics;

using Sitecore.Sandbox.Data.IDTables;

namespace Sitecore.Sandbox.Data.SqlServer
{
    public class CompositeSqlServerIDTable : IDTableProvider
    {
        private IDictionary<string, IDTableProvider> _IDTableProviders;
        private IDictionary<string, IDTableProvider> IDTableProviders
        {
            get
            {
                if (_IDTableProviders == null)
                {
                    _IDTableProviders = new Dictionary<string, IDTableProvider>();
                }

                return _IDTableProviders;
            }
        }

        private string DatabaseName { get; set; }

        public CompositeSqlServerIDTable()
            : this(GetDefaultDatabaseName())
        {
        }

        public CompositeSqlServerIDTable(string databaseName)
        {
            SetDatabaseName(databaseName);
        }

        private void SetDatabaseName(string databaseName)
        {
            Assert.ArgumentNotNullOrEmpty(databaseName, "databaseName");
            DatabaseName = databaseName;
        }

        public override void Add(IDTableEntry entry)
        {
            foreach (IDTableProvider provider in IDTableProviders.Values)
            {
                provider.Add(entry);
            }
        }

        public override IDTableEntry GetID(string prefix, string key)
        {
            return GetContextIDTableProvider().GetID(prefix, key);
        }

        public override IDTableEntry[] GetKeys(string prefix)
        {
            return GetContextIDTableProvider().GetKeys(prefix);
        }

        public override IDTableEntry[] GetKeys(string prefix, ID id)
        {
            return GetContextIDTableProvider().GetKeys(prefix, id);
        }

        protected virtual IDTableProvider GetContextIDTableProvider()
        {
            IDTableProvider provider;
            if (IDTableProviders.TryGetValue(DatabaseName, out provider))
            {
                return provider;
            }

            return new NullIDTable();
        }

        public override void Remove(string prefix, string key)
        {
            foreach (IDTableProvider provider in IDTableProviders.Values)
            {
                provider.Remove(prefix, key);
            }
        }

        protected virtual void AddIDTable(XmlNode configNode)
        {
            if (configNode == null || string.IsNullOrWhiteSpace(configNode.InnerText))
            {
                return;
            }

            IDTableProvider idTable = Factory.CreateObject<IDTableProvider>(configNode);
            if (idTable == null)
            {
                Log.Error("Configuration invalid for an IDTable!", this);
                return;
            }

            XmlAttribute idAttribute = configNode.Attributes["id"];
            if (idAttribute == null || string.IsNullOrWhiteSpace(idAttribute.Value))
            {
                Log.Error("IDTable configuration should have an id attribute set!", this);
                return;
            }

            if(IDTableProviders.ContainsKey(idAttribute.Value))
            {
                Log.Error("Duplicate IDTable id encountered!", this);
                return;
            }

            IDTableProviders.Add(idAttribute.Value, idTable);
        }

        private static string GetDefaultDatabaseName()
        {
            if (Context.ContentDatabase != null)
            {
                return Context.ContentDatabase.Name;
            }

            return Context.Database.Name;
        }
    }
}
The above class uses the Composite design pattern — it adds/removes entries in multiple IDTableProvider instances (these instances are specified in the configuration file that is shown later in this post), and delegates calls to the GetKeys and GetID methods of the instance that is referenced by the database name passed in to the class’ constructor.
The CompositeSqlServerIDTable class also utilizes a Null Object by creating an instance of the following class when the context database does not exist in the collection:
using System.Collections.Generic;

using Sitecore.Data;
using Sitecore.Data.IDTables;

namespace Sitecore.Sandbox.Data.IDTables
{
    public class NullIDTable : IDTableProvider
    {
        public NullIDTable()
        {
        }

        public override void Add(IDTableEntry entry)
        {
            return;
        }

        public override IDTableEntry GetID(string prefix, string key)
        {
            return null;
        }

        public override IDTableEntry[] GetKeys(string prefix)
        {
            return new List<IDTableEntry>().ToArray();
        }

        public override IDTableEntry[] GetKeys(string prefix, ID id)
        {
            return new List<IDTableEntry>().ToArray();
        }

        public override void Remove(string prefix, string key)
        {
            return;
        }
    }
}
The NullIDTable class above basically has no behavior, returns null for the GetID method, and an empty collection for both GetKeys methods. Having a Null Object helps us avoid checking for nulls when performing operations on the IDTableProvider instance when an instance cannot be found in the IDTableProviders Dictionary property — although we lose visibility around the context database not being present in the Dictionary (I probably should’ve included some logging code to capture this).
I then glued everything together using the following configuration file:
<?xml version="1.0" encoding="utf-8" ?>
<configuration xmlns:patch="http://www.sitecore.net/xmlconfig/">
  <sitecore>
    <IDTable patch:instead="IDTable[@type='Sitecore.Data.$(database).$(database)IDTable, Sitecore.Kernel']" type="Sitecore.Sandbox.Data.$(database).Composite$(database)IDTable" singleInstance="true">
      <IDTables hint="raw:AddIDTable">
        <IDTable id="core" type="Sitecore.Data.$(database).$(database)IDTable, Sitecore.Kernel" singleInstance="true">
          <param connectionStringName="$(id)"/>
          <param desc="cacheSize">500KB</param>
        </IDTable>
        <IDTable id="master" type="Sitecore.Data.$(database).$(database)IDTable, Sitecore.Kernel" singleInstance="true">
          <param connectionStringName="$(id)"/>
          <param desc="cacheSize">500KB</param>
        </IDTable>
        <IDTable id="web" type="Sitecore.Data.$(database).$(database)IDTable, Sitecore.Kernel" singleInstance="true">
          <param connectionStringName="$(id)"/>
          <param desc="cacheSize">500KB</param>
        </IDTable>
      </IDTables>
    </IDTable>
  </sitecore>
</configuration>
To test the code above, I created the following web form which basically invokes add/remove methods on the instance of our IDTableProvider, and displays the entries in our IDTables after each add/remove operation:
using System;
using System.Collections.Generic;
using System.Linq;

using Sitecore.Configuration;
using Sitecore.Data.IDTables;

namespace Sandbox
{
    public partial class IDTableTest : System.Web.UI.Page
    {
        protected void Page_Load(object sender, EventArgs e)
        {
            AddEntries();
            ShowEntries();
            RemoveOneEntry();
            ShowEntries();
            RemoveAllEntries();
            ShowEntries();
        }

        private void AddEntries()
        {
            Response.Write("Adding two entries...<br /><br />");
            IDTable.Add("IDTableTest", "/mycoolhomepage1.aspx", Sitecore.Data.ID.Parse("{110D559F-DEA5-42EA-9C1C-8A5DF7E70EF9}"));
            IDTable.Add("IDTableTest", "/someotherpage1.aspx", Sitecore.Data.ID.Parse("{BAB78AE5-8118-4476-B1B5-F8981DAE1779}"));
        }

        private void RemoveOneEntry()
        {
            Response.Write("Removing one entry...<br /><br />");
            IDTable.RemoveKey("IDTableTest", "/mycoolhomepage1.aspx");
        }

        private void RemoveAllEntries()
        {
            Response.Write("Removing all entries...<br /><br />");
            foreach (IDTableEntry entry in IDTable.GetKeys("IDTableTest"))
            {
                IDTable.RemoveKey(entry.Prefix, entry.Key);
            }
        }

        private void ShowEntries()
        {
            ShowEntries("core");
            ShowEntries("master");
            ShowEntries("web");
        }

        private void ShowEntries(string databaseName)
        {
            IDTableProvider provider = CreateNewIDTableProvider(databaseName);
            IEnumerable<IDTableEntry> entries = IDTable.GetKeys("IDTableTest");
            Response.Write(string.Format("{0} entries in IDTable in the {1} database:<br />", entries.Count(), databaseName));
            foreach (IDTableEntry entry in provider.GetKeys("IDTableTest"))
            {
                Response.Write(string.Format("key: {0} id: {1}<br />", entry.Key, entry.ID));
            }
            Response.Write("<br />");
        }

        protected virtual IDTableProvider CreateNewIDTableProvider(string databaseName)
        {
            return Factory.CreateObject(string.Format("//IDTable[@id='{0}']", databaseName), true) as IDTableProvider;
        }
    }
}
When I loaded up the web form above in a browser, I saw that things were working as expected:

Although I had fun in writing all of the code above, I feel this isn’t exactly ideal for synchronizing entries in IDTables across multiple Sitecore databases. I cannot see why one would want an entry for a Item in master that has not yet been published to the web database.
If you know of a scenario where the above code could be useful, or have suggestions on making it better, please drop a comment.
In my next post, I will show you what I feel is a better approach to synchronizing entries across IDTables — a solution that synchronizes entries via publishing and Item deletion.
Until next time, have a Sitecorelicious day!
Periodically Rebuild Link Databases using an Agent in Sitecore
Last week a colleague had asked me whether rebuilding the Link Database would solve an issue she was seeing. That conversation got me thinking: wouldn’t it be nice if we could automate the rebuilding of the Link Database for each Sitecore database at a scheduled time?
I am certain others have already created solutions to do this — if you know of any, please share in a comment — but I didn’t conduct a search to find any (I normally advocate not reinventing the wheel for code solutions but wanted to have some fun building a new solution).
In the spirit of my post on putting Sitecore to work for you, I built the following Sitecore agent (check out John West’s blog post on Sitecore agents to learn more):
using System;
using System.Collections.Generic;
using System.Diagnostics;
using System.Xml;

using Sitecore.Configuration;
using Sitecore.Data;
using Sitecore.Diagnostics;
using Sitecore.Jobs;

namespace Sitecore.Sandbox.Tasks
{
    public class RebuildLinkDatabasesAgent
    {
        private static readonly IList<Database> Databases = new List<Database>();
        private static readonly Stopwatch Stopwatch = Stopwatch.StartNew();

        public void Run()
        {
            JobManager.Start(CreateNewJobOptions());
        }

        protected virtual JobOptions CreateNewJobOptions()
        {
            return new JobOptions("RebuildLinkDatabasesAgent", "index", Context.Site.Name, this, "RebuildLinkDatabases");
        }

        protected virtual void RebuildLinkDatabases()
        {
            Job job = Context.Job;
            try
            {
                RebuildLinkDatabases(Databases);
            }
            catch (Exception ex)
            {
                job.Status.Failed = true;
                job.Status.Messages.Add(ex.ToString());
            }

            job.Status.State = JobState.Finished;
        }

        private void RebuildLinkDatabases(IEnumerable<Database> databases)
        {
            Assert.ArgumentNotNull(databases, "databases");
            foreach (Database database in databases)
            {
                Stopwatch.Start();
                RebuildLinkDatabase(database);
                Stopwatch.Stop();
                LogEntry(database, Stopwatch.Elapsed.Milliseconds);
            }
        }

        protected virtual void RebuildLinkDatabase(Database database)
        {
            Assert.ArgumentNotNull(database, "database");
            Globals.LinkDatabase.Rebuild(database);
        }

        protected virtual void LogEntry(Database database, int elapsedMilliseconds)
        {
            Assert.ArgumentNotNull(database, "database");
            if (string.IsNullOrWhiteSpace(LogEntryFormat))
            {
                return;
            }

            Log.Info(string.Format(LogEntryFormat, database.Name, elapsedMilliseconds), this);
        }

        private static void AddDatabase(XmlNode configNode)
        {
            if (configNode == null || string.IsNullOrWhiteSpace(configNode.InnerText))
            {
                return;
            }

            Database database = TryGetDatabase(configNode.InnerText);
            if (database != null)
            {
                Databases.Add(database);
            }
        }

        private static Database TryGetDatabase(string databaseName)
        {
            Assert.ArgumentNotNullOrEmpty(databaseName, "databaseName");
            try
            {
                return Factory.GetDatabase(databaseName);
            }
            catch (Exception ex)
            {
                Type agentType = typeof(RebuildLinkDatabasesAgent);
                Log.Error(agentType.ToString(), ex, agentType);
            }

            return null;
        }

        private string LogEntryFormat { get; set; }
    }
}
Logic in the class above reads in a list of databases set in a configuration file, adds them to a list for processing — these are only added to the list if they exist — and rebuilds the Link Database in each via a Sitecore job.
I added some timing logic to see how long it takes to rebuild each database, and capture this information in the Sitecore log.
I then wired up the above class in Sitecore using the following patch include configuration file:
<?xml version="1.0" encoding="utf-8"?>
<configuration xmlns:patch="http://www.sitecore.net/xmlconfig/">
  <sitecore>
    <scheduling>
      <agent type="Sitecore.Sandbox.Tasks.RebuildLinkDatabasesAgent" method="Run" interval="00:01:00">
        <databases hint="raw:AddDatabase">
          <database>core</database>
          <database>master</database>
          <database>web</database>
        </databases>
        <LogEntryFormat>Rebuilt link database: {0} in {1} milliseconds.</LogEntryFormat>
      </agent>
    </scheduling>
  </sitecore>
</configuration>
I’ve set this agent to run every minute for testing, but it would probably be wise to have this run no more than once or twice a day.
After waiting a bit, I saw the following in my Sitecore log:

I do question the rebuild times. These seem quite small, especially when it takes a while to rebuild the Link Databases via the Sitecore Control Panel. If you have any ideas/thoughts on why there is an incongruence between the times in my log and how long it takes to rebuild these via the Sitecore Control Panel, please share in a comment.
Further, if you have any recommendations on making this code better, or have other ideas on automating the rebuilding of Link Databases in Sitecore, please drop a comment.
Until next time, have a Sitecoretastic day!
Add Buttons to Field Types in Sitecore
In a previous post I showed how one could go about removing a button from a field type in Sitecore, and felt a complementary post on adding a new button to a field type was in order.
In this post I will show you how I added a ‘Tomorrow’ button to a new Date field type — I duplicated the existing Date field type (you’ll see this later on in this post) — although I am uncertain how useful such a button would be. In other words, I’m not advocating the Date field type have a ‘Tomorrow’ button. I have created it only as an example.
I first subclassed Sitecore.Shell.Applications.ContentEditor.Date in Sitecore.Kernel.dll so that our new Date control — I’ve named this DateExtended — contains all functionality of the “out of the box” Date control:
using System;

using Sitecore.Diagnostics;
using Sitecore.Web.UI.Sheer;
using Sitecore.Shell.Applications.ContentEditor;

namespace Sitecore.Sandbox.Shell.Applications.ContentEditor
{
    public class DateExtended : Date
    {
        public override void HandleMessage(Message message)
        {
            if (!ShouldHandleMessage(message))
            {
                return;
            }

            if (IsTomorrowClick(message))
            {
                SetDateTomorrow();
                return;
            }

            base.HandleMessage(message);
        }

        private bool ShouldHandleMessage(Message message)
        {
            return IsCurrentControl(message)
                    && !string.IsNullOrWhiteSpace(message.Name);
        }

        private bool IsCurrentControl(Message message)
        {
            return AreEqualIgnoreCase(message["id"], ID);
        }

        private static bool IsTomorrowClick(Message message)
        {
            return AreEqualIgnoreCase(message.Name, "contentdate:tomorrow");
        }

        private void SetDateTomorrow()
        {
            SetValue(GetDateTomorrow());
        }

        protected virtual string GetDateTomorrow()
        {
            return DateUtil.ToIsoDate(System.DateTime.Today.AddDays(1));
        }

        private static bool AreEqualIgnoreCase(string one, string two)
        {
            return string.Equals(one, two, StringComparison.CurrentCultureIgnoreCase);
        }
    }
}
I overrode the HandleMessage() method above to ascertain whether we should handle the message passed to it — only the “contentdate:tomorrow” message should be handled, and this is passed when the ‘Tomorrow’ button is clicked (later on in this post, you will see how this message is associated with the ‘Tomorrow’ button in Sitecore) — and delegate to the base class when another message is passed, and that message is for the current control (this is when message[“id”] is equal to the ID property on the control).
If the ‘Tomorrow’ button was clicked, we derive tomorrow’s date, convert it to the ISO date format, and set it as the value of the field via the SetValue() method which is defined in the Sitecore.Shell.Applications.ContentEditor.Date class.
I then registered our library of controls — a library composed of the one lonely control shown above — with Sitecore via a patch configuration file:
<?xml version="1.0"?>
<configuration xmlns:patch="http://www.sitecore.net/xmlconfig/">
  <sitecore>
    <controlSources>
      <source mode="on" namespace="Sitecore.Sandbox.Shell.Applications.ContentEditor" assembly="Sitecore.Sandbox" prefix="content"/>
    </controlSources>
  </sitecore>
</configuration>
I then duplicated the Date field type to a new field type:
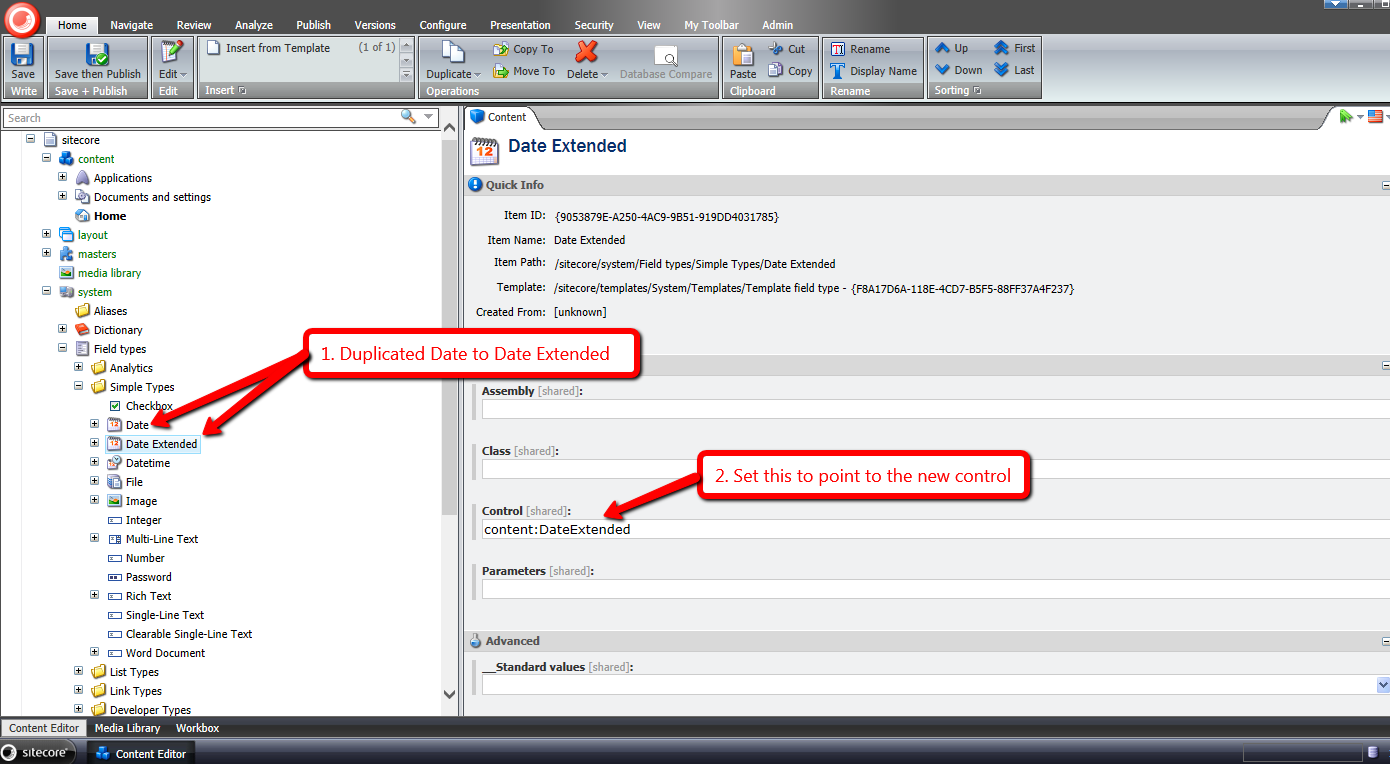
The Control field contains the “content” prefix defined in the patch configuration file above and the name of the DateExtended class — both are joined together by a colon.
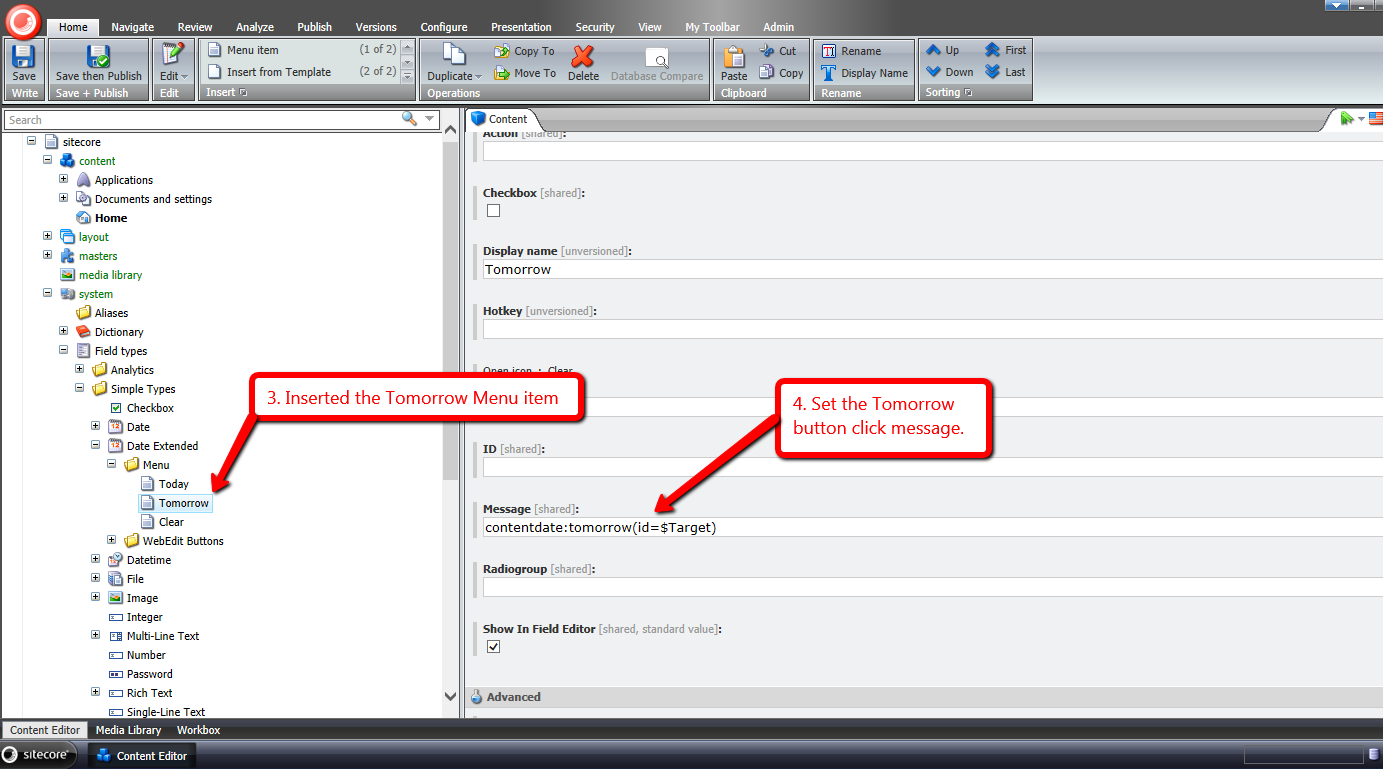
Under the new field type I added the new Menu item (button) for ‘Tomorrow’, and associated the “contentdate:tomorrow” message with it:
Let’s try this out!
I created a field on a template using our new field type above:

I navigated to an item using the template above, and clicked the ‘Tomorrow’ button:
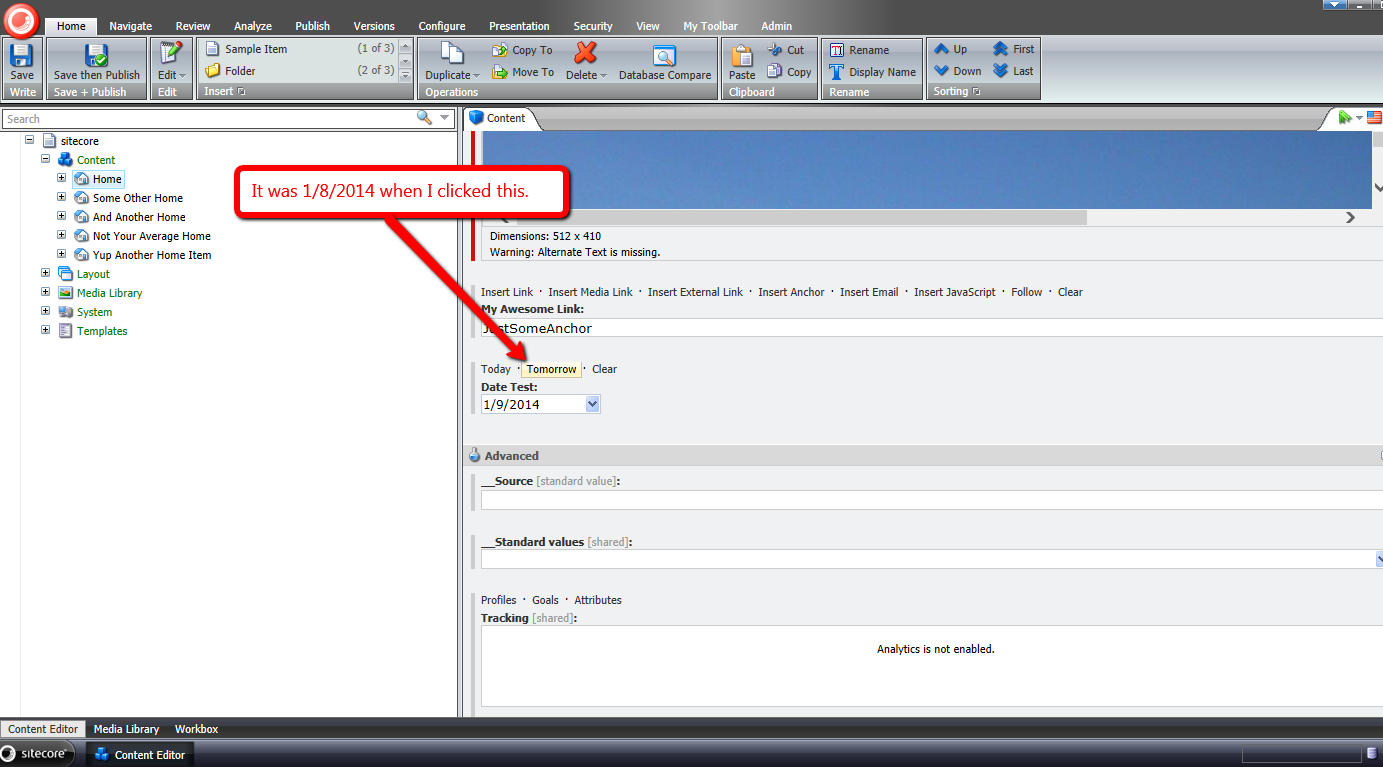
As you can see the next day’s date was set on the field.
If you have any examples of where you had to add a new button to an existing field type, or ideas for new buttons that might be useful, please share in a comment.
