


The other day I was poking around Sitecore.Forms.Core.dll — this is one of the assemblies that comes with Web Forms for Marketers (what, you don’t randomly look at code in the Sitecore assemblies? 😉 ) — and decided to check out how the export functionality of the Form Reports work.
Once I felt I understood how the export code functions, I decided to take a stab at building my own custom export: functionality to export to CSV, and built the following class to serve as a pipeline processor to wedge Form Reports data into CSV format:
using System;
using System.Collections.Generic;
using System.Linq;

using Sitecore.Diagnostics;
using Sitecore.Form.Core.Configuration;
using Sitecore.Form.Core.Pipelines.Export;
using Sitecore.Forms.Data;
using Sitecore.Jobs;

namespace Sitecore.Sandbox.Form.Core.Pipelines.Export.Csv
{
    public class ExportToCsv
    {
        public void Process(ExportArgs args)
        {
            Assert.ArgumentNotNull(args, "args");
            LogInfo();
            args.Result = GenerateCsv(args.Packet.Entries);
        }

        protected virtual void LogInfo()
        {
            Job job = Context.Job;
            if (job != null)
            {
                job.Status.LogInfo(ResourceManager.Localize("EXPORTING_DATA"));
            }
        }

        private string GenerateCsv(IEnumerable<IForm> forms)
        {
            return string.Join(Environment.NewLine, GenerateAllCsvRows(forms));
        }

        protected virtual IEnumerable<string> GenerateAllCsvRows(IEnumerable<IForm> forms)
        {
            Assert.ArgumentNotNull(forms, "forms");
            IList<string> rows = new List<string>();
            rows.Add(GenerateCsvHeader(forms.FirstOrDefault()));
            foreach (IForm form in forms)
            {
                string row = GenerateCsvRow(form);
                if (!string.IsNullOrWhiteSpace(row))
                {
                    rows.Add(row);
                }
            }

            return rows;
        }

        protected virtual string GenerateCsvHeader(IForm form)
        {
            Assert.ArgumentNotNull(form, "form");
            return string.Join(",", form.Field.Select(field => field.FieldName));
        }

        protected virtual string GenerateCsvRow(IForm form)
        {
            Assert.ArgumentNotNull(form, "form");
            return string.Join(",", form.Field.Select(field => field.Value));
        }
    }
}
There really isn’t anything magical happening in the code above. The code creates a string of comma-separated values for each row of entries in args.Packet.Entries, and puts these plus a CSV header into a collection of strings.
Once all rows have been placed into a collection of strings, they are munged together on the newline character ultimately creating a multi-row CSV string. This CSV string is then set on the Result property of the ExportArgs instance.
Now we need a way to invoke a pipeline that contains the above class as a processor, and the following command does just that:
using System.Collections.Specialized;

using Sitecore.Diagnostics;
using Sitecore.Forms.Core.Commands.Export;
using Sitecore.Form.Core.Configuration;
using Sitecore.Shell.Framework.Commands;

namespace Sitecore.Sandbox.Forms.Core.Commands.Export
{
    public class Export : ExportToXml
    {
        protected override void AddParameters(NameValueCollection parameters)
        {
            parameters["filename"] = FileName;
            parameters["contentType"] = MimeType;
        }

        public override void Execute(CommandContext context)
        {
            SetProperties(context);
            base.Execute(context);
        }

        private void SetProperties(CommandContext context)
        {
            Assert.ArgumentNotNull(context, "context");
            Assert.ArgumentNotNull(context.Parameters, "context.Parameters");
            Assert.ArgumentNotNullOrEmpty(context.Parameters["fileName"], "context.Parameters[\"fileName\"]");
            Assert.ArgumentNotNullOrEmpty(context.Parameters["mimeType"], "context.Parameters[\"mimeType\"]");
            Assert.ArgumentNotNullOrEmpty(context.Parameters["exportPipeline"], "context.Parameters[\"exportPipeline\"]");
            Assert.ArgumentNotNullOrEmpty(context.Parameters["progressDialogTitle"], "context.Parameters[\"progressDialogTitle\"]");
            FileName = context.Parameters["fileName"];
            MimeType = context.Parameters["mimeType"];
            ExportPipeline = context.Parameters["exportPipeline"];
            ProgressDialogTitle = context.Parameters["progressDialogTitle"];
        }

        protected override string GetName()
        {
            return ProgressDialogTitle;
        }

        protected override string GetProcessorName()
        {
            return ExportPipeline;
        }

        private string FileName { get; set; }

        private string MimeType { get; set; }

        private string ExportPipeline { get; set; }

        private string ProgressDialogTitle { get; set; }
    }
}
I modeled the above command after Sitecore.Forms.Core.Commands.Export.ExportToExcel in Sitecore.Forms.Core.dll: this command inherits some useful logic of Sitecore.Forms.Core.Commands.Export.ExportToXml but differs along the pipeline being invoked, the name of the export file, and content type of the file being created.
I decided to make the above command be generic: the name of the file, pipeline, progress dialog title — this is a heading that is displayed in a modal dialog that is launched when the data is being exported from the Form Reports — and content type of the file are passed to it from Sitecore via Sheer UI buttons (see below).
I then registered all of the above in Sitecore via the following patch configuration file:
<?xml version="1.0" encoding="utf-8"?>
<configuration xmlns:patch="http://www.sitecore.net/xmlconfig/">
  <sitecore>
    <commands>
      <command name="forms:export" type="Sitecore.Sandbox.Forms.Core.Commands.Export.Export, Sitecore.Sandbox" />
    </commands>
    <pipelines>
      <exportToCsv>
        <processor type="Sitecore.Sandbox.Form.Core.Pipelines.Export.Csv.ExportToCsv, Sitecore.Sandbox" />
        <processor type="Sitecore.Form.Core.Pipelines.Export.SaveContent, Sitecore.Forms.Core" />
      </exportToCsv>
    </pipelines>
  </sitecore>
</configuration>
Now we must wire the command to Sheer UI buttons. This is how I wired up the export ‘All’ button (this button is available in a dropdown of the main export button in the Form Reports):

I then created another export button which is used when exporting selected rows in the Form Reports:

Let’s see this in action!
I opened up the Form Reports for a test form I had built for a previous blog post, and selected some rows (notice the ‘To CSV’ button in the ribbon):

I clicked the ‘To CSV’ button — doing this launched a progress dialog (I wasn’t fast enough to grab a screenshot of it) — and was prompted to download the following file:

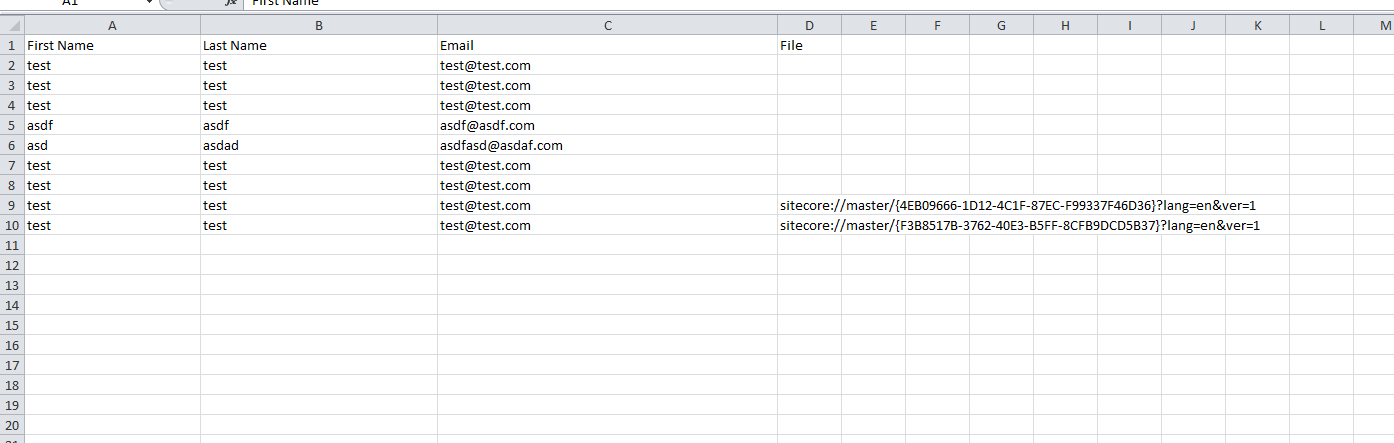
As you can see, the file looks beautiful in Excel 😉 :
If you have any thoughts on this, or ideas for other export data formats that could be incorporated into the Form Reports of Web Forms for Marketers, please share in a comment.
Until next time, have a Sitecoretastic day!

Hello My requirement is I want to export data on front end. I have created a button on sub-layout and now i want to export on click of this button. Is it possible?
Yes, this is possible.
You will have to get the form records using a Sitecore.Forms.Data.DataProviders.WFMDataProvider instance.
Can you please share some code if you have, so I can get idea how I can implement this.
Hello I have done it please see http://sitecoretweaks.wordpress.com/2014/07/02/sitecore-export-to-csvexcel-of-web-form-for-marketers-form-wffm-reports/
blog
Thanks Mike! This article was a very helpful reference point for my own customization of the WFFM export.
I am happy to hear that!
Thanks!
How would you deal with commas in the input fields? For instance, I have a ‘comments’ field, and when a user enters a comma in that field and submits the form it will cause the CSV export to skip a column. I’ve searched around and haven’t found a way to replace characters in wffm fields.