Home » Sitecore (Page 7)
Category Archives: Sitecore
Set Default Alternate Text on Images Uploaded to the Sitecore Media Library
For the past couple of years, I have been trying to come up with an idea for adding a custom <getMediaCreatorOptions> pipeline processor — this is no lie or exaggeration — but had not thought of any good reason to do so until today: I figured out that I could add a processor to set default alternate text on an image being uploaded into the Sitecore Media Library.
The following class contains code to serve as a <getMediaCreatorOptions> pipeline processor to set default alternate text on an image Item during upload:
using Sitecore.Diagnostics;
using Sitecore.Pipelines.GetMediaCreatorOptions;

namespace Sitecore.Sandbox.Pipelines.GetMediaCreatorOptions
{
    public class SetDefaultAlternateTextIfNeed
    {
        public void Process(GetMediaCreatorOptionsArgs args)
        {
            Assert.ArgumentNotNull(args, "args");
            if (!string.IsNullOrWhiteSpace(args.Options.AlternateText))
            {
                return;
            }

            args.Options.AlternateText = GetAlternateText(args);
        }

        protected virtual string GetAlternateText(GetMediaCreatorOptionsArgs args)
        {
            Assert.ArgumentNotNull(args, "args");
            if (string.IsNullOrWhiteSpace(args.Options.Destination) || args.Options.Destination.IndexOf("/") < 0)
            {
                return string.Empty;
            }

            int startofNameIndex = args.Options.Destination.LastIndexOf("/") + 1;
            return args.Options.Destination.Substring(startofNameIndex);
        }
    }
}
The code above will set the AlternateText property of the Options property of the GetMediaCreatorOptionsArgs instance when its not set: I set it to be the name of the Media Library Item by default — I extract this from the path destination of the Item.
I then registered the above class as a <getMediaCreatorOptions> pipeline processor in the following Sitecore configuration file:
<?xml version="1.0" encoding="utf-8" ?>
<configuration xmlns:patch="http://www.sitecore.net/xmlconfig/">
  <sitecore>
    <pipelines>
      <getMediaCreatorOptions>
        <processor type="Sitecore.Sandbox.Pipelines.GetMediaCreatorOptions.SetDefaultAlternateTextIfNeed, Sitecore.Sandbox"/>
      </getMediaCreatorOptions>
    </pipelines>
  </sitecore>
</configuration>
Let’s try this out.
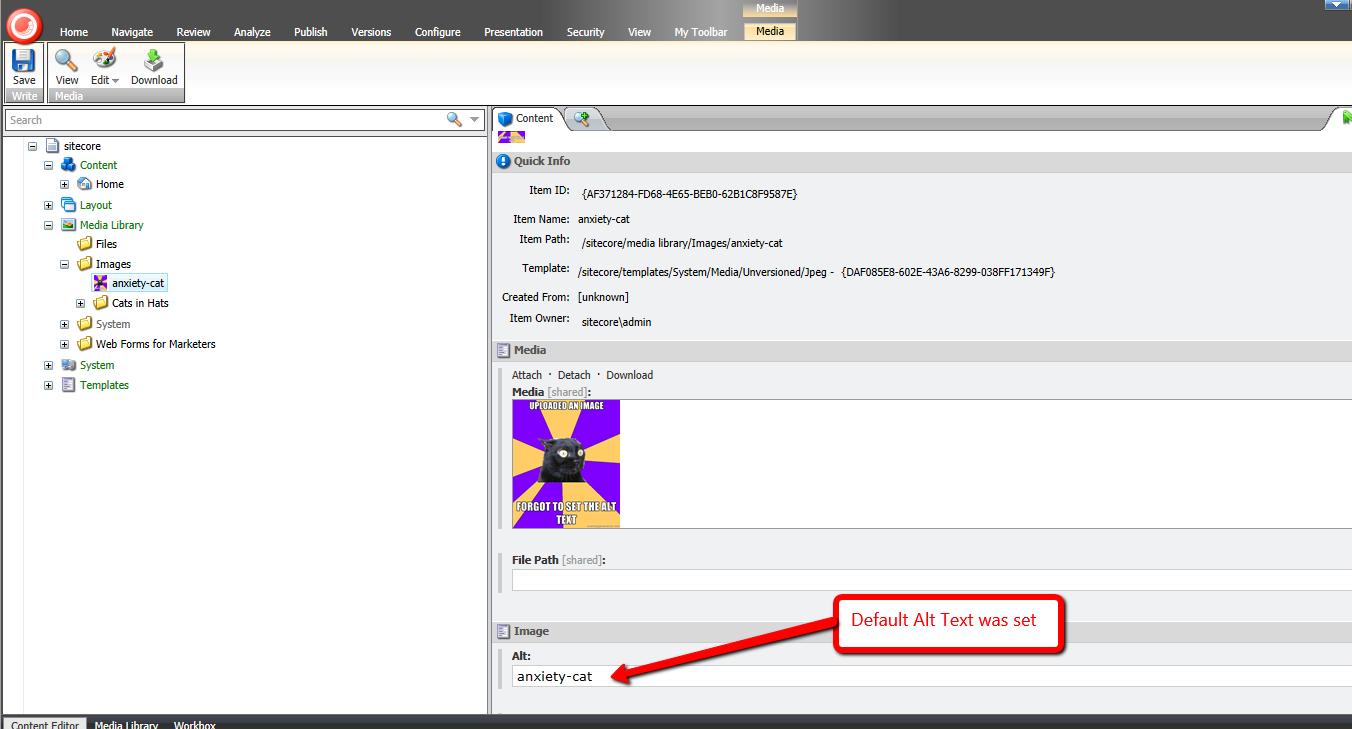
I went to my Media Library, and selected an image to upload:

During the upload, I did not specify its alternate text.
As you can see, it was given an alternate text value by default:
If you have any thoughts on this, please drop a comment.
But whatever you do, just don’t let this happen to you:

Restrict Certain Files from Being Uploaded Through Web Forms for Marketers Forms in Sitecore: an Alternative Approach
This past weekend I noticed the <formUploadFile> pipeline in Web Forms for Marketers (WFFM), and wondered whether I could create an alternative solution to the one I had shared in this post — I had built a custom WFFM field type to prevent certain files from being uploaded through WFFM forms.
After some tinkering, I came up the following class to serve as a <formUploadFile> pipeline processor:
using System;
using System.Collections.Generic;
using System.Web;

using Sitecore.Diagnostics;

using Sitecore.Form.Core.Pipelines.FormUploadFile;

namespace Sitecore.Sandbox.Form.Pipelines.FormUploadFile
{
    public class CheckMimeTypesNotAllowed
    {
        static CheckMimeTypesNotAllowed()
        {
            MimeTypesNotAllowed = new List<string>();
        }

        public void Process(FormUploadFileArgs args)
        {
            Assert.ArgumentNotNull(args, "args");
            string mimeType = GetMimeType(args.File.FileName);
            if (IsMimeTypeAllowed(mimeType))
            {
                return;
            }

            throw new Exception(string.Format("Uploading a file with MIME type {0} is not allowed", mimeType));
        }

        protected virtual string GetMimeType(string fileName)
        {
            Assert.ArgumentNotNullOrEmpty(fileName, "fileName");
            return MimeMapping.GetMimeMapping(fileName);
        }

        protected virtual bool IsMimeTypeAllowed(string mimeType)
        {
            foreach (string mimeTypeNotAllowed in MimeTypesNotAllowed)
            {
                if (AreEqualIgnoreCase(mimeTypeNotAllowed, mimeType))
                {
                    return false;
                }
            }

            return true;
        }

        private static bool AreEqualIgnoreCase(string stringOne, string stringTwo)
        {
            return string.Equals(stringOne, stringTwo, StringComparison.CurrentCultureIgnoreCase);
        }

        private static void AddMimeTypeNotAllowed(string mimeType)
        {
            if (string.IsNullOrWhiteSpace(mimeType) || MimeTypesNotAllowed.Contains(mimeType))
            {
                return;
            }

            MimeTypesNotAllowed.Add(mimeType);
        }

        private static IList<string> MimeTypesNotAllowed { get; set; }
    }
}
The class above adds restricted MIME types to a list — these MIME types are defined in a configuration file shown below — and checks to see if the uploaded file’s MIME type is in the restricted list. If it is restricted, an exception is thrown with some information — throwing an exception in WFFM prevents the form from being submitted.
MIME types are inferred using System.Web.MimeMapping.GetMimeMapping(string fileName), a method that is new in .NET 4.5 (this solution will not work in older versions of .NET).
I then registered the class above as a <formUploadFile> pipeline processor via the following configuration file:
<configuration xmlns:patch="http://www.sitecore.net/xmlconfig/" xmlns:x="http://www.sitecore.net/xmlconfig/">
  <sitecore>
    <pipelines>
      <formUploadFile>
        <processor patch:before="processor[@type='Sitecore.Form.Core.Pipelines.FormUploadFile.Save, Sitecore.Forms.Core']"
                   type="Sitecore.Sandbox.Form.Pipelines.FormUploadFile.CheckMimeTypesNotAllowed">
          <mimeTypesNotAllowed hint="list:AddMimeTypeNotAllowed">
            <mimeType>application/octet-stream</mimeType>
          </mimeTypesNotAllowed >
        </processor>
      </formUploadFile>
    </pipelines>
  </sitecore>
</configuration>
In case you are wondering, the MIME type being passed to the processor in the configuration file is for executables.
Let’s see how we did. 😉
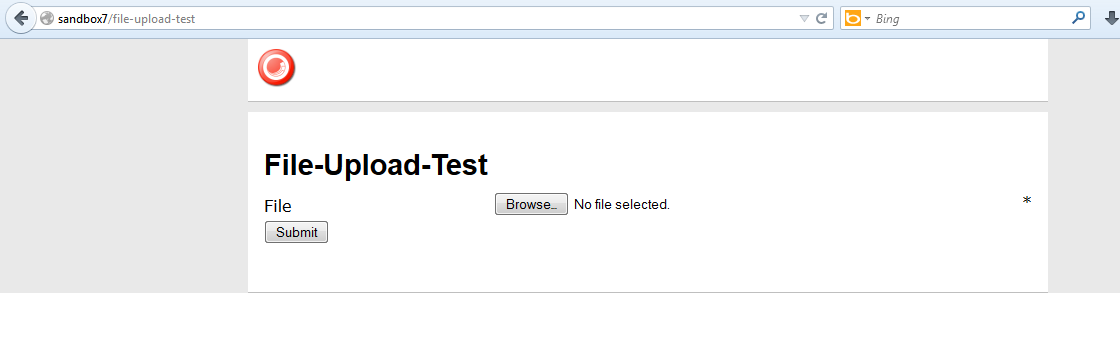
I whipped up a test form, and pulled it up in a browser:
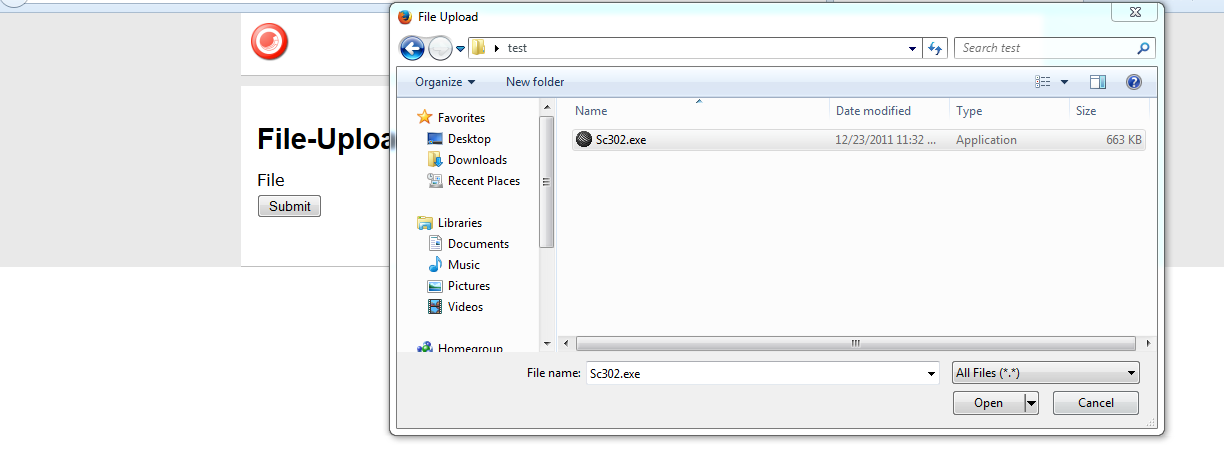
I then selected an executable:
I saw this after an attempt to submit the form:
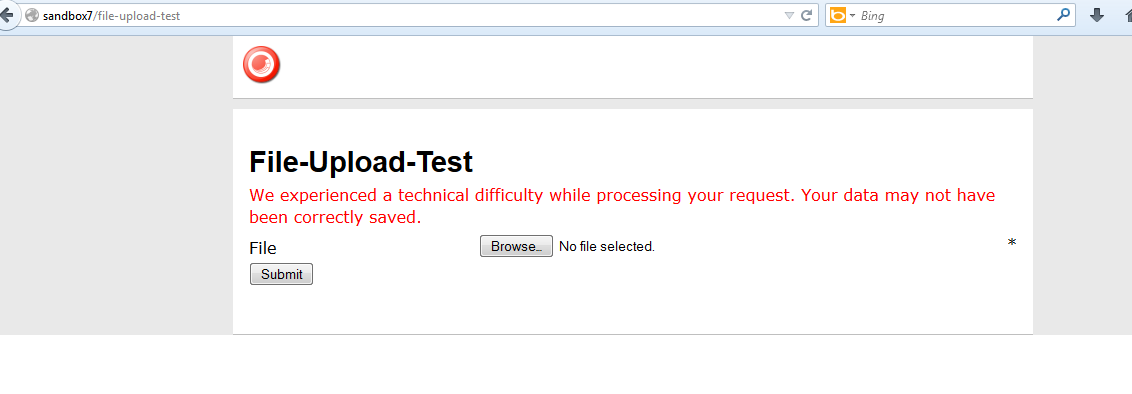
And my log file expressed why:

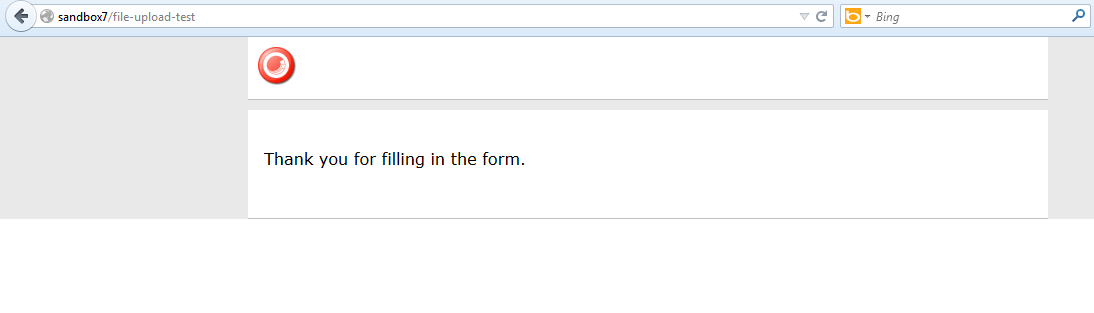
I then copied a jpeg into my test folder, and selected it to be uploaded:

After clicking the submit button, I was given a nice confirmation message:
There is one problem with the solution above that I would like to point out: it does not address the issue of file extensions being changed. I could not solve this problem since the MIME type of the file being uploaded cannot be determined from the Sitecore.Form.Core.Media.PostedFile instance set in the arguments object: there is no property for it. 😦
If you know of another way to determine MIME types on Sitecore.Form.Core.Media.PostedFile instances, or have other ideas for restricting certain files from being uploaded through WFFM, please share in a comment.
Show Submitted Web Forms for Marketers Form Field Values on a Confirmation Page in Sitecore
Recently on my About page, someone had asked me how to show submitted form field values in Web Forms for Marketers.
I had done such a thing in a past project, and thought I would share how I went about accomplishing this.
This solution reuses an instance of a storage class I had used in a previous post.
This is the interface for that storage class:
namespace Sitecore.Sandbox.Utilities.Storage
{
    public interface IRepository<TKey, TValue>
    {
        bool Contains(TKey key);

        TValue this[TKey key] { get; set; }

        void Put(TKey key, TValue value);

        void Remove(TKey key);

        void Clear();

        TValue Get(TKey key);
    }
}
This is the implementation of the storage class:
using System.Web;
using System.Web.SessionState;

using Sitecore.Diagnostics;

namespace Sitecore.Sandbox.Utilities.Storage
{
    public class SessionRepository : IRepository<string, object>
    {
        private HttpSessionStateBase Session { get; set; }

        public object this[string key]
        {
            get
            {
                return Get(key);
            }
            set
            {
                Put(key, value);
            }
        }

        public SessionRepository()
            : this(HttpContext.Current.Session)
        {
        }

        public SessionRepository(HttpSessionState session)
            : this(CreateNewHttpSessionStateWrapper(session))
        {
        }

        public SessionRepository(HttpSessionStateBase session)
        {
            SetSession(session);
        }

        private void SetSession(HttpSessionStateBase session)
        {
            Assert.ArgumentNotNull(session, "session");
            Session = session;
        }

        public bool Contains(string key)
        {
            return Session[key] != null;
        }

        public void Put(string key, object value)
        {
            Assert.ArgumentNotNullOrEmpty(key, "key");
            Assert.ArgumentCondition(IsSerializable(value), "value", "value must be serializable!");
            Session[key] = value;
        }

        private static bool IsSerializable(object instance)
        {
            Assert.ArgumentNotNull(instance, "instance");
            return instance.GetType().IsSerializable;
        }

        public void Remove(string key)
        {
            Session.Remove(key);
        }

        public void Clear()
        {
            Session.Clear();
        }

        public object Get(string key)
        {
            return Session[key];
        }

        private static HttpSessionStateWrapper CreateNewHttpSessionStateWrapper(HttpSessionState session)
        {
            Assert.ArgumentNotNull(session, "session");
            return new HttpSessionStateWrapper(session);
        }
    }
}
The class above basically serializes a supplied object, and puts it into session using a key given by the calling code.
Plus, you can remove objects saved in it using a key.
I modified this class from the original version: I declared the constructors public so that I can reference them in a Sitecore configuration file (you will see this configuration file further down in this post).
I then created a POCO to house form field values for serialization purposes:
using System;
using System.Collections.Generic;

namespace Sitecore.Sandbox.Form.Submit.DTO
{
    [Serializable]
    public class Field
    {
        public string Name { get; set; }

        public string Value { get; set; }
    }
}
Field values belong to a form, so I built another POCO class to store a collection of Sitecore.Sandbox.Form.Submit.DTO.Field class instances, and also hold on to the submitted form’s ID:
using System;
using System.Collections.Generic;

namespace Sitecore.Sandbox.Form.Submit.DTO
{
    [Serializable]
    public class FormSubmission
    {
        public Guid ID { get; set; }

        public List<Field> Fields { get; set; }
    }
}
Now we need a custom Web Forms for Marketers SaveAction — all custom SaveActions must implement Sitecore.Form.Core.Client.Data.Submit.ISaveAction which is defined in Sitecore.Forms.Core.dll — to create and store instances of the POCO classes defined above:
using System.Collections.Generic;

using Sitecore.Configuration;
using Sitecore.Data;
using Sitecore.Diagnostics;
using Sitecore.Web;

using Sitecore.Form.Core.Client.Data.Submit;
using Sitecore.Form.Core.Controls.Data;
using Sitecore.Form.Submit;

using Sitecore.Sandbox.Form.Submit.DTO;
using Sitecore.Sandbox.Utilities.Storage;

namespace Sitecore.Sandbox.Form.Submit
{
    public class StoreForm : ISaveAction
    {
        static StoreForm()
        {
            RepositoryKey = Settings.GetSetting("RepositoryKey");
            Assert.IsNotNullOrEmpty(RepositoryKey, "RepositoryKey must be set in your configuration!");

            Repository = Factory.CreateObject("repository", true) as IRepository<string, object>;
            Assert.IsNotNull(Repository, "Repository must be set in your configuration!");
        }

        public void Execute(ID formid, AdaptedResultList fields, params object[] data)
        {
            StoreFormSubmission(formid, fields);
        }

        protected virtual void StoreFormSubmission(ID formid, AdaptedResultList fields)
        {
            FormSubmission form = CreateNewFormSubmission(formid, fields);
            Repository[GetRepositoryKey()] = form;
        }

        protected virtual FormSubmission CreateNewFormSubmission(ID formid, AdaptedResultList fields)
        {
            return new FormSubmission
            {
                ID = formid.Guid,
                Fields = CreateNewFields(fields)
            };
        }

        protected virtual List<Field> CreateNewFields(AdaptedResultList results)
        {
            Assert.ArgumentNotNull(results, "results");
            List<Field> fields = new List<Field>();
            foreach (AdaptedControlResult result in results)
            {
                fields.Add(new Field{ Name = result.FieldName, Value = result.Value });
            }

            return fields;
        }

        protected virtual string GetRepositoryKey()
        {
            return string.Concat(RepositoryKey, "_", WebUtil.GetSessionID());
        }

        private static string RepositoryKey { get; set; }

        private static IRepository<string, object> Repository { get; set; }
    }
}
The SaveAction above creates instances of the POCO classes above using the submitted form field values, and passes these to an instance of a IRepository: this is defined in the configuration file below jointly with a substring of the unique storage key (this is a concatenation of the key defined in the following configuration file and the user’s session ID to guarantee a unique key):
<?xml version="1.0" encoding="utf-8" ?>
<configuration xmlns:patch="http://www.sitecore.net/xmlconfig/">
  <sitecore>
    <repository type="Sitecore.Sandbox.Utilities.Storage.SessionRepository" />
    <settings>
      <setting name="RepositoryKey" value="MyRepository"/>
    </settings>
  </sitecore>
</configuration>
I then registered the ISaveAction class above in Web Forms for Marketers:

I then wired it up to my test form:

For testing, I created the following sublayout — no, it’s not the prettiest code I have ever written but I needed something quick for testing — which I mapped to a confirmation page:
<%@ Control Language="C#" AutoEventWireup="true" CodeBehind="Form Submission Confirmation.ascx.cs" Inherits="Sandbox.layouts.sublayouts.FormSubmissionConfirmation" %>
<asp:Repeater ID="rptConfirmation" runat="server">
    <HeaderTemplate>
        <h2>What you gave us:</h2>
    </HeaderTemplate>
    <ItemTemplate>
        <%# Eval("Name") %>: <%# Eval("Value") %>
    </ItemTemplate>
    <SeparatorTemplate>
        <br />
    </SeparatorTemplate>
</asp:Repeater>
The following class serves as the code-behind for the sublayout:
using System;
using System.Collections.Generic;
using System.Linq;
using System.Web;
using System.Web.UI;
using System.Web.UI.WebControls;

using Sitecore.Configuration;
using Sitecore.Diagnostics;
using Sitecore.Sandbox.Form.Submit.DTO;
using Sitecore.Sandbox.Utilities.Storage;
using Sitecore.Web;

namespace Sandbox.layouts.sublayouts
{
    public partial class FormSubmissionConfirmation : System.Web.UI.UserControl
    {
        private static string RepositoryKey { get; set; }

        private static IRepository<string, object> Repository { get; set; }

        static FormSubmissionConfirmation()
        {
            RepositoryKey = Settings.GetSetting("RepositoryKey");
            Assert.IsNotNullOrEmpty(RepositoryKey, "RepositoryKey must be set in your configuration!");

            Repository = Factory.CreateObject("repository", true) as IRepository<string, object>;
            Assert.IsNotNull(Repository, "Repository must be set in your configuration!");
        }

        protected void Page_Load(object sender, EventArgs e)
        {
            string key = GetRepositoryKey();
            FormSubmission submission = Repository.Get(key) as FormSubmission;
            Repository.Remove(key);
            if (submission == null || !submission.Fields.Any())
            {
               Visible = false;
                return;
            }

            rptConfirmation.DataSource = submission.Fields;
            rptConfirmation.DataBind();
        }

        protected virtual string GetRepositoryKey()
        {
            return string.Concat(RepositoryKey, "_", WebUtil.GetSessionID());
        }
    }
}
The code-behind above gets the FormSubmission instance from the IRepository instance defined in the configuration file shown above, and passes the Field POCO instances within it to a repeater.
Let’s see this in action!
I navigated to my test form, and filled it in:

After submitting the form, I was redirected to my confirmation page. As you can see the form values I had entered are displayed:

One thing to note: the solution above only works when your Web Forms for Marketers confirmation page is its own page, and you set your form to redirect to it after submitting the form.
If you have any thoughts on this, or know of other ways to show submitted Web Forms for Marketers form field values on a confirmation page, please share in a comment.
Make Bulk Item Updates using Sitecore PowerShell Extensions
In my Sitecore PowerShell Extensions presentation at the Sitecore User Group Conference 2014, I demonstrated how simple it is to make bulk Item updates — perform the same update to multiple Sitecore items — using a simple PowerShell script, and thought I would write down what I had shown.
Sadly, I do not remember which script I had shared with the audience — the scratchpad text file I referenced during my presentation contains multiple scripts for making bulk updates to Items (if you attended my talk, and remember exactly what I had shown, please drop a comment).
Since I cannot recall which script I had shown — please forgive me 😉 — let’s look at the following PowerShell script (this might be the script I had shown):
@(Get-Item .) + (Get-ChildItem -r .) | ForEach-Object { Expand-Token $_ }
This script grabs the context Item — this is denoted by a period — within the PowerShell ISE via the Get-Item command, and puts it into an array so that we can concatenate it with an array of all of its descendants — this is returned by the Get-ChildItem command with the -r parameter (r stands for recursive). The script then iterates over all Items in the resulting array, passes each to the Expand-Token command — this command is offered “out of the box” in Sitecore PowerShell Extensions — which expands tokens in every field on the Item.
Let’s see this in action!
My home Item has some tokens in its Title field:

One of its descendants also has tokens in its Title field:

I opened up the PowerShell ISE, wrote my script, and executed:

As you can see, the tokens on the home Item were expanded:

They were also expanded on the home Item’s descendant:

If you have any thoughts or questions on this, please share in a comment.
Execute PowerShell Scripts in Scheduled Tasks using Sitecore PowerShell Extensions
At the Sitecore User Group Conference 2014, I demonstrated how to invoke PowerShell scripts in a Sitecore Scheduled Task using Sitecore PowerShell Extensions, and felt I should pen what I had shown in a blog post — yes, you guessed it: this is that blog post. 😉
In my presentation, I shared the following PowerShell script with the audience:
ForEach($site in [Sitecore.Configuration.Factory]::GetSiteNames()) {
    $siteInfo = [Sitecore.Configuration.Factory]::GetSiteInfo($site)
    if($siteInfo -ne $null) {
         $siteInfo.HtmlCache.Clear()
         $logEntry = [string]::Format("HtmlCache.Clear() invoked for {0}", $siteInfo.Name)
         Write-Log $logEntry
    }
}
The script above iterates over all sites in your Sitecore instance, clears the Html Cache for each, and creates log entries expressing the Html Cache was cleared for all sites processed.
You would probably never have to use a script like the one above. I only wrote it for demonstration purposes since I couldn’t think of a more practical example to show. If you can think of any practical examples, or feel the script above has some practicality, please share in a comment.
I wrote, tested, and saved the above script in the PowerShell ISE:

The PowerShell script was saved to a new Item created by the dialog above:

I then created a Schedule Item to invoke the script housed in the Item above (to learn more about Sitecore Scheduled Tasks, please see John West‘s post discussing them):

I saved my Item, waited a bit, and opened up my latest Sitecore log file:

As you can see, the Html Cache was cleared for each site in my Sitecore instance.
If you have any questions/comments/thoughts on this, please drop a comment.
Build a Custom Command in Sitecore PowerShell Extensions
In my Sitecore PowerShell Extensions presentation at the Sitecore User Group Conference 2014, I showed the audience how easy it is to build custom commands for Sitecore PowerShell Extensions, and thought it would be a good idea to distill what I had shown into a blog post for future reference. This blog post embodies that endeavor.
During my presentation, I shared an example of using the template method pattern for two commands using the following base class:
using System;
using System.Collections.Generic;
using System.Linq;
using System.Management.Automation;

using Sitecore.Data.Items;

using Cognifide.PowerShell.PowerShellIntegrations.Commandlets;

namespace Sitecore.Sandbox.SPE.Commandlets.Data
{
    public abstract class EditItemCommand : BaseCommand
    {
        protected override void ProcessRecord()
        {
            ProcessItem(Item);
            if (!Recurse.IsPresent)
            {
                return;
            }

            ProcessItems(Item.Children, true);
        }

        private void ProcessItems(IEnumerable<Item> items, bool recursive)
        {
            foreach (Item item in items)
            {
                ProcessItem(item);
                if (recursive && item.Children.Any())
                {
                    ProcessItems(item.Children, recursive);
                }
            }
        }

        private void ProcessItem(Item item)
        {
            item.Editing.BeginEdit();
            try
            {
                EditItem(item);
                item.Editing.EndEdit();
            }
            catch (Exception exception)
            {
                item.Editing.CancelEdit();
                throw exception;
            }

            WriteItem(item);
        }

        protected abstract void EditItem(Item item);

        [Parameter(ValueFromPipeline = true, ValueFromPipelineByPropertyName = true)]
        public Item Item { get; set; }

        [Parameter]
        public SwitchParameter Recurse { get; set; }
    }
}
The class above defines the basic algorithm for editing an Item — the editing part occurs in the EditItem() method which must be defined by subclasses — and all of its descendants when the Recurse switch is supplied to the command. When the Recursive switch is supplied, recursion is employed to process all descendants of the Item once editing of the supplied Item is complete.
The following subclass of the EditItemCommand class above protects a supplied Item in its implementation of the EditItem() method:
using System;
using System.Management.Automation;

using Sitecore.Data.Items;

namespace Sitecore.Sandbox.SPE.Commandlets.Data
{
    [OutputType(new Type[] { typeof(Sitecore.Data.Items.Item) }), Cmdlet("Protect", "Item")]
    public class ProtectItemCommand : EditItemCommand
    {
        protected override void EditItem(Item item)
        {
            item.Appearance.ReadOnly = true;
        }
    }
}
Conversely, the following subclass of the EditItemCommand class unprotects the passed Item in its EditItem() method implementation:
using System;
using System.Management.Automation;

using Sitecore.Data.Items;

namespace Sitecore.Sandbox.SPE.Commandlets.Data
{
    [OutputType(new Type[] { typeof(Sitecore.Data.Items.Item) }), Cmdlet("Unprotect", "Item")]
    public class UnprotectItemCommand : EditItemCommand
    {
        protected override void EditItem(Item item)
        {
            item.Appearance.ReadOnly = false;
        }
    }
}
The verb and noun for each command is defined in the Cmdlet class attribute set on each command class declaration.
I then registered all of the above in Sitecore using the following configuration file:
<configuration xmlns:patch="http://www.sitecore.net/xmlconfig/">
  <sitecore>
    <powershell>
      <commandlets>
            <add Name="Sitecore Sandbox Commandlets" type="*, Sitecore.Sandbox" />
      </commandlets>
    </powershell>
  </sitecore>
</configuration>
Since everything looks copacetic — you got to love a developer’s optimism 😉 — I built and deployed all of the above to my Sitecore instance.
Let’s take this for a spin!
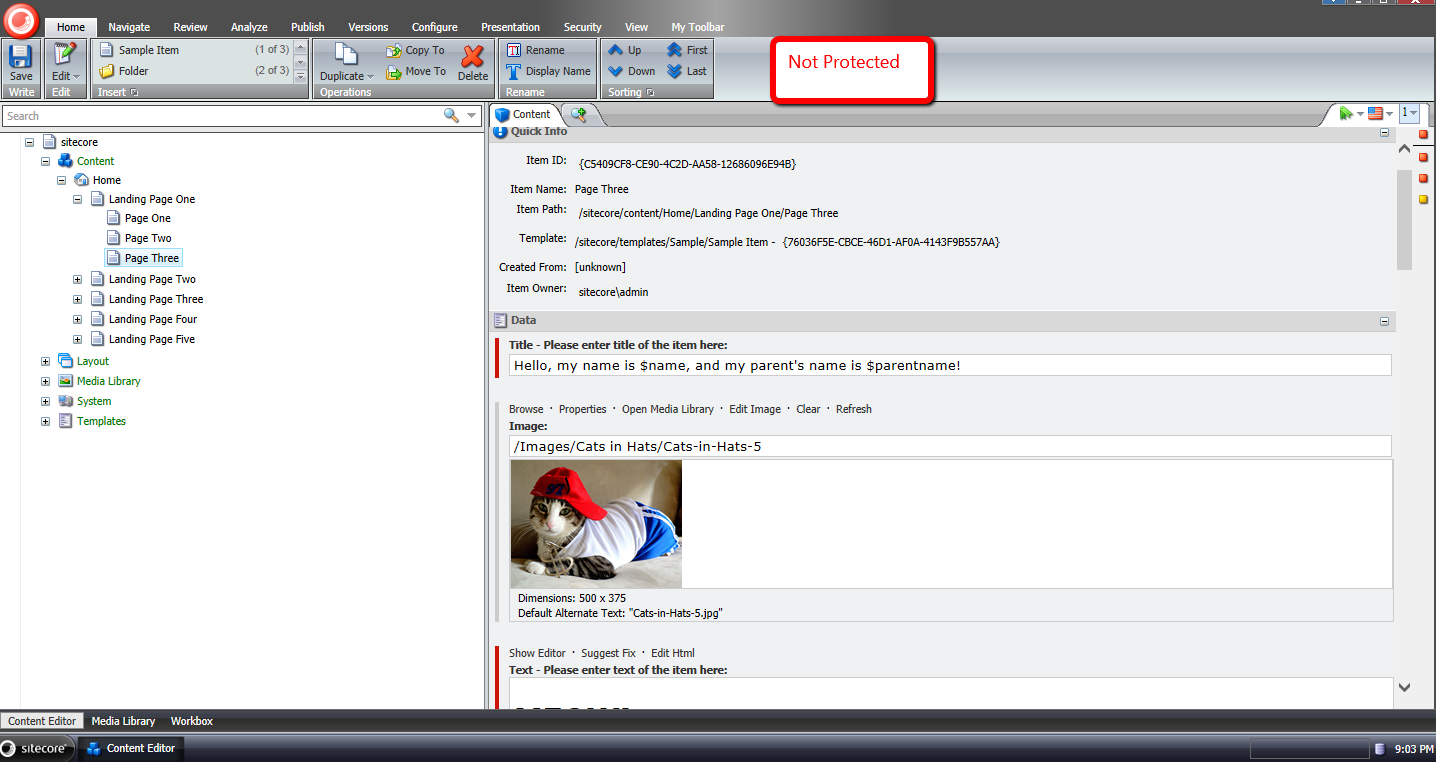
I selected my home Item knowing it is not protected:

I then looked to see if it had an unprotected descendant, and found the following item:
I then ran a script on the home Item using our new command to protect an item, and supplied the Recurse switch to protect all descendants:

As you can see, the home Item is now protected:

Its descendant is also protected:

Let’s now unprotect them. I ran a script on the home Item using our new command to unprotect an item, and supplied the Recurse switch to process all descendants:

As you can see, the home Item is now unprotected again:

Its descendant is also unprotected:

If you have any thoughts or ideas around improving anything you’ve seen in this post, or have other ideas for commands that should be included in Sitecore PowerShell Extensions, please drop a comment.
I would also like to point out that I had written a previous blog post on creating a custom command in Sitecore PowerShell Extensions. You might want to go check that out as well.
Until next time, have a scriptastic day! 🙂
Create a Custom Report in Sitecore PowerShell Extensions
During my Sitecore PowerShell Extensions presentation at the Sitecore User Group Conference 2014, I showcased a custom report I had scripted using the Sitecore PowerShell Extensions module, and thought I would jot down what I had shown coupled with some steps on how you could go about creating your own custom report.
I had shown the audience the following PowerShell script:
<#
    .SYNOPSIS
        Lists all images with an empty Alt field.

    .NOTES
        Mike Reynolds
#>

function Get-ImageItemNoAltText {
    $items = Get-ChildItem -Path "master:\sitecore\media library\images" -Recurse | Where-Object { $_.Fields["Alt"] -ne $null }

    foreach($item in $items) {
        if($item."Alt" -eq '') {
            $item
        }
    }
}

$items = Get-ImageItemNoAltText

if($items.Count -eq 0) {
    Show-Alert "There are no images with an empty Alt field."
} else {
    $props = @{
        InfoTitle = "Images with an empty Alt field"
        InfoDescription = "Lists all images with an empty Alt field."
        PageSize = 25
    }

    $items |
        Show-ListView @props -Property @{Label="Name"; Expression={$_.DisplayName} },
            @{Label="Updated"; Expression={$_.__Updated} },
            @{Label="Updated by"; Expression={$_."__Updated by"} },
            @{Label="Created"; Expression={$_.__Created} },
            @{Label="Created by"; Expression={$_."__Created by"} },
            @{Label="Path"; Expression={$_.ItemPath} }
}
Close-Window
I modeled the above script after the “out of the box” ‘Unused media items’ report but made some changes: it grabs all media library items recursively under /sitecore/Media Library/Images — you could definitely change this to /sitecore/Media Library to get all images outside of the Images folder — in Sitecore that have an Alt field, and that Alt field’s value is equal to the empty string.
I then tested — yes, I do test my code, don’t you 😉 — and saved my report using the PowerShell ISE:

The report was saved in this Item created just for it:

Let’s see this in action!
I went to Sitecore –> Reporting Tools –> PowerShell Reports –> Mikes Media Audit, and clicked on the new report:

After running the report, I was presented with this dialog containing the results:

I then clicked on the first row of the report, and was brought to an image with an empty Alt field:

If you have any thoughts on this, or would like to see additional reports in Sitecore PowerShell Extensions, please share in a comment.
Launch PowerShell Scripts in the Item Context Menu using Sitecore PowerShell Extensions
Last week during my Sitecore PowerShell Extensions presentation at the Sitecore User Group Conference 2014 — a conference held in Utrecht, Netherlands — I demonstrated how to invoke PowerShell scripts from the Item context menu in Sitecore, and felt I should capture what I had shown in a blog post — yes, this is indeed that blog post. 😉
During that piece of my presentation, I shared the following PowerShell script to expands tokens in fields of a Sitecore item (if you want to learn more about tokens in Sitecore, please take a look at John West’s post about them, and also be aware that one can also invoke the Expand-Token PowerShell command that comes with Sitecore PowerShell Extensions to expand tokens on Sitecore items — this makes things a whole lot easier 😉 ):
$item = Get-Item .
$tokenReplacer = [Sitecore.Configuration.Factory]::GetMasterVariablesReplacer()
$item.Editing.BeginEdit()
$tokenReplacer.ReplaceItem($item)
$item.Editing.EndEdit()
Close-Window
The script above calls Sitecore.Configuration.Factory.GetMasterVariablesReplacer() for an instance of the MasterVariablesReplacer class — which is defined and can be overridden in the “MasterVariablesReplacer” setting in your Sitecore instance’s Web.config — and passes the context item — this is denote by a period — to the MasterVariablesReplacer instance’s ReplaceItem() method after the item has been put into editing mode.
Once the Item has been processed, it is taken out of editing mode.
So how do we save this script so that we can use it in the Item context menu? The following screenshot walks you through the steps to do just that:

The script is saved to an Item created by the dialog above:

Let’s test this out!
I selected an Item with unexpanded tokens:

I then launched its Item context menu, and clicked the option we created to ‘Expand Tokens’:

As you can see the tokens were expanded:

If you have any questions or thoughts on this, please drop a comment.
Until next time, have a scriptolicious day 😉
Add ‘Has Content In Language’ Property to Sitecore Item Web API Responses
The other day I had read a forum thread on SDN where the poster had asked whether one could determine if content returned from the Sitecore Item Web API for an Item was the actual content for the Item in the requested language.
I was intrigued by this question because I would have assumed that no results would be returned for the Item when it does not have content in the requested language but that is not the case: I had replicated what the poster had seen.
As a workaround, I built the following class to serve as an <itemWebApiGetProperties> pipeline processor which sets a property in the response indicating whether the Item has content in the requested language (check out my previous post on adding additional properties to Sitecore Item Web API responses for more information on this topic):
using System.Collections.Generic;
using System.Linq;

using Sitecore.Data.Items;
using Sitecore.Diagnostics;
using Sitecore.Globalization;
using Sitecore.ItemWebApi.Pipelines.GetProperties;

namespace Sitecore.Sandbox.ItemWebApi.Pipelines.GetProperties
{
    public class SetHasContentInLanguageProperty : GetPropertiesProcessor
    {
        public override void Process(GetPropertiesArgs arguments)
        {
            Assert.ArgumentNotNull(arguments, "arguments");
            Assert.ArgumentNotNull(arguments.Item, "arguments.Item");
            arguments.Properties.Add("HasContentInLanguage", IsLanguageInCollection(arguments.Item.Languages, arguments.Item.Language));
        }

        private static bool IsLanguageInCollection(IEnumerable<Language> languages, Language language)
        {
            Assert.ArgumentNotNull(languages, "languages");
            Assert.ArgumentNotNull(language, "language");
            return languages.Any(lang => lang == language);
        }
    }
}
The code in the above class checks to see if the Item has content in the requested language — the latter is set in the Language property of the Item instance, and the Languages property contains a list of all languages it has content for.
I then added the above pipeline processor via the following configuration file:
<?xml version="1.0" encoding="utf-8"?>
<configuration xmlns:patch="http://www.sitecore.net/xmlconfig/">
  <sitecore>
    <pipelines>
      <itemWebApiGetProperties>
        <processor patch:after="processor[@type='Sitecore.ItemWebApi.Pipelines.GetProperties.GetProperties, Sitecore.ItemWebApi']"
            type="Sitecore.Sandbox.ItemWebApi.Pipelines.GetProperties.SetHasContentInLanguageProperty, Sitecore.Sandbox" />
      </itemWebApiGetProperties>
    </pipelines>
  </sitecore>
</configuration>
Let’s see how this works!
I first created an Item for testing:

This Item only has content in English:

I then toggled my Sitecore Item Web API configuration to allow for anonymous access so that I can make requests in my browser, and made a request for the test Item in English:

The Item does have content in English, and this is denoted by the ‘HasContentInLanguage’ property.
I then made a request for the Item in French:

As expected, the ‘HasContentInLanguage’ is false since the Item does not have content in French.
If you have any questions or thoughts on this, please drop a comment.
Export to CSV in the Form Reports of Sitecore’s Web Forms for Marketers
The other day I was poking around Sitecore.Forms.Core.dll — this is one of the assemblies that comes with Web Forms for Marketers (what, you don’t randomly look at code in the Sitecore assemblies? 😉 ) — and decided to check out how the export functionality of the Form Reports work.
Once I felt I understood how the export code functions, I decided to take a stab at building my own custom export: functionality to export to CSV, and built the following class to serve as a pipeline processor to wedge Form Reports data into CSV format:
using System;
using System.Collections.Generic;
using System.Linq;

using Sitecore.Diagnostics;
using Sitecore.Form.Core.Configuration;
using Sitecore.Form.Core.Pipelines.Export;
using Sitecore.Forms.Data;
using Sitecore.Jobs;

namespace Sitecore.Sandbox.Form.Core.Pipelines.Export.Csv
{
    public class ExportToCsv
    {
        public void Process(ExportArgs args)
        {
            Assert.ArgumentNotNull(args, "args");
            LogInfo();
            args.Result = GenerateCsv(args.Packet.Entries);
        }

        protected virtual void LogInfo()
        {
            Job job = Context.Job;
            if (job != null)
            {
                job.Status.LogInfo(ResourceManager.Localize("EXPORTING_DATA"));
            }
        }

        private string GenerateCsv(IEnumerable<IForm> forms)
        {
            return string.Join(Environment.NewLine, GenerateAllCsvRows(forms));
        }

        protected virtual IEnumerable<string> GenerateAllCsvRows(IEnumerable<IForm> forms)
        {
            Assert.ArgumentNotNull(forms, "forms");
            IList<string> rows = new List<string>();
            rows.Add(GenerateCsvHeader(forms.FirstOrDefault()));
            foreach (IForm form in forms)
            {
                string row = GenerateCsvRow(form);
                if (!string.IsNullOrWhiteSpace(row))
                {
                    rows.Add(row);
                }
            }

            return rows;
        }

        protected virtual string GenerateCsvHeader(IForm form)
        {
            Assert.ArgumentNotNull(form, "form");
            return string.Join(",", form.Field.Select(field => field.FieldName));
        }

        protected virtual string GenerateCsvRow(IForm form)
        {
            Assert.ArgumentNotNull(form, "form");
            return string.Join(",", form.Field.Select(field => field.Value));
        }
    }
}
There really isn’t anything magical happening in the code above. The code creates a string of comma-separated values for each row of entries in args.Packet.Entries, and puts these plus a CSV header into a collection of strings.
Once all rows have been placed into a collection of strings, they are munged together on the newline character ultimately creating a multi-row CSV string. This CSV string is then set on the Result property of the ExportArgs instance.
Now we need a way to invoke a pipeline that contains the above class as a processor, and the following command does just that:
using System.Collections.Specialized;

using Sitecore.Diagnostics;
using Sitecore.Forms.Core.Commands.Export;
using Sitecore.Form.Core.Configuration;
using Sitecore.Shell.Framework.Commands;

namespace Sitecore.Sandbox.Forms.Core.Commands.Export
{
    public class Export : ExportToXml
    {
        protected override void AddParameters(NameValueCollection parameters)
        {
            parameters["filename"] = FileName;
            parameters["contentType"] = MimeType;
        }

        public override void Execute(CommandContext context)
        {
            SetProperties(context);
            base.Execute(context);
        }

        private void SetProperties(CommandContext context)
        {
            Assert.ArgumentNotNull(context, "context");
            Assert.ArgumentNotNull(context.Parameters, "context.Parameters");
            Assert.ArgumentNotNullOrEmpty(context.Parameters["fileName"], "context.Parameters[\"fileName\"]");
            Assert.ArgumentNotNullOrEmpty(context.Parameters["mimeType"], "context.Parameters[\"mimeType\"]");
            Assert.ArgumentNotNullOrEmpty(context.Parameters["exportPipeline"], "context.Parameters[\"exportPipeline\"]");
            Assert.ArgumentNotNullOrEmpty(context.Parameters["progressDialogTitle"], "context.Parameters[\"progressDialogTitle\"]");
            FileName = context.Parameters["fileName"];
            MimeType = context.Parameters["mimeType"];
            ExportPipeline = context.Parameters["exportPipeline"];
            ProgressDialogTitle = context.Parameters["progressDialogTitle"];
        }

        protected override string GetName()
        {
            return ProgressDialogTitle;
        }

        protected override string GetProcessorName()
        {
            return ExportPipeline;
        }

        private string FileName { get; set; }

        private string MimeType { get; set; }

        private string ExportPipeline { get; set; }

        private string ProgressDialogTitle { get; set; }
    }
}
I modeled the above command after Sitecore.Forms.Core.Commands.Export.ExportToExcel in Sitecore.Forms.Core.dll: this command inherits some useful logic of Sitecore.Forms.Core.Commands.Export.ExportToXml but differs along the pipeline being invoked, the name of the export file, and content type of the file being created.
I decided to make the above command be generic: the name of the file, pipeline, progress dialog title — this is a heading that is displayed in a modal dialog that is launched when the data is being exported from the Form Reports — and content type of the file are passed to it from Sitecore via Sheer UI buttons (see below).
I then registered all of the above in Sitecore via the following patch configuration file:
<?xml version="1.0" encoding="utf-8"?>
<configuration xmlns:patch="http://www.sitecore.net/xmlconfig/">
  <sitecore>
    <commands>
      <command name="forms:export" type="Sitecore.Sandbox.Forms.Core.Commands.Export.Export, Sitecore.Sandbox" />
    </commands>
    <pipelines>
      <exportToCsv>
        <processor type="Sitecore.Sandbox.Form.Core.Pipelines.Export.Csv.ExportToCsv, Sitecore.Sandbox" />
        <processor type="Sitecore.Form.Core.Pipelines.Export.SaveContent, Sitecore.Forms.Core" />
      </exportToCsv>
    </pipelines>
  </sitecore>
</configuration>
Now we must wire the command to Sheer UI buttons. This is how I wired up the export ‘All’ button (this button is available in a dropdown of the main export button in the Form Reports):

I then created another export button which is used when exporting selected rows in the Form Reports:

Let’s see this in action!
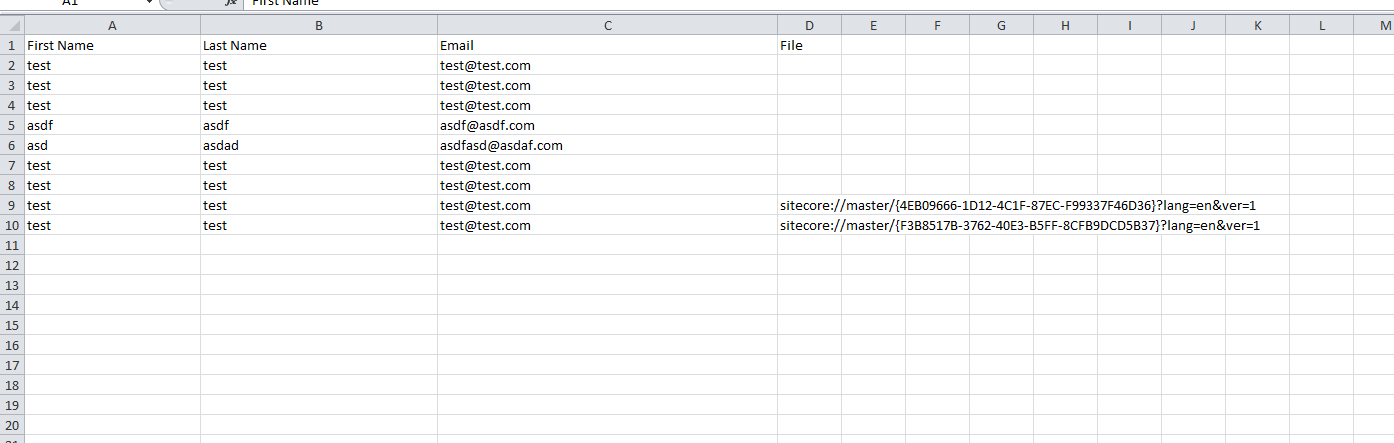
I opened up the Form Reports for a test form I had built for a previous blog post, and selected some rows (notice the ‘To CSV’ button in the ribbon):

I clicked the ‘To CSV’ button — doing this launched a progress dialog (I wasn’t fast enough to grab a screenshot of it) — and was prompted to download the following file:

As you can see, the file looks beautiful in Excel 😉 :
If you have any thoughts on this, or ideas for other export data formats that could be incorporated into the Form Reports of Web Forms for Marketers, please share in a comment.
Until next time, have a Sitecoretastic day!
